The reference manual for the Finance app — every page, in order. Set fee amounts per term and class, open a billing period, and the invoices write themselves. Then the collections desk turns every payment into a numbered receipt — with cash-up, reconciliation, debtors, clearance, refunds, approvals, the reports, and a real ledger underneath. New to the desk? Start with the bursar quick start.
finance.simusim.comBursar: phone + PIN · Admin: emailReference manual~25 min read
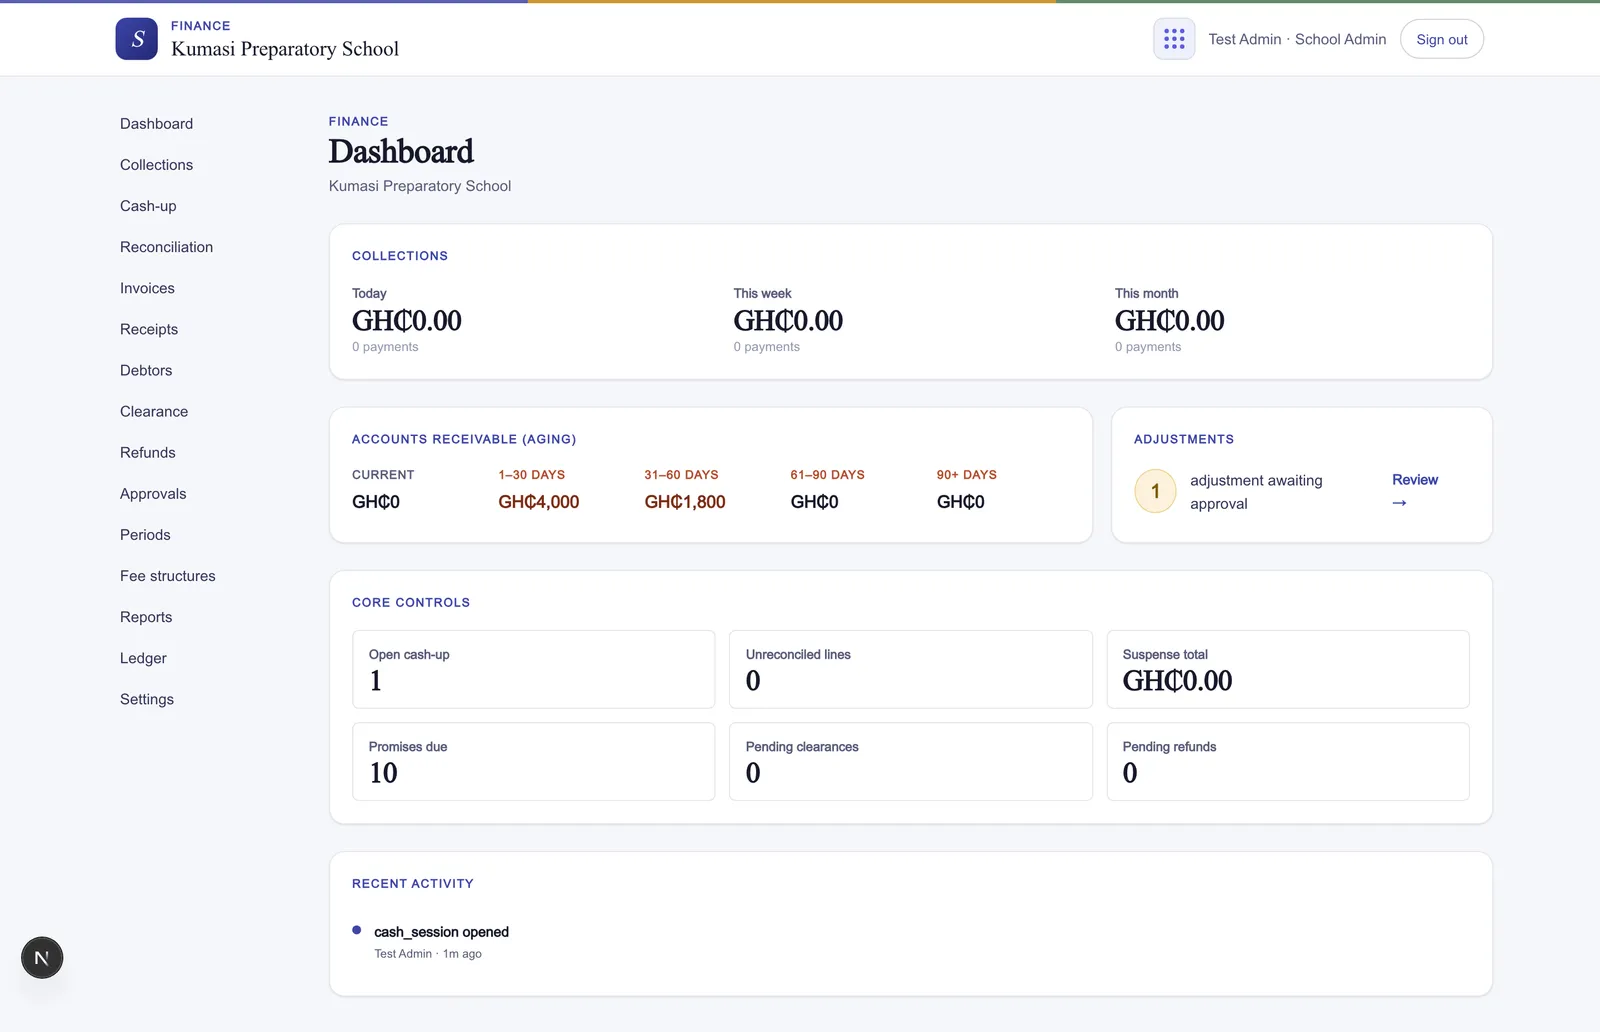
Bursars are granted by an admin in Settings → Bursar management. The Dashboard greets both with collections for today / this week / this month, an accounts-receivable ageing summary, pending approvals, and recent activity.
Fig.The Finance dashboard — today's takings, the ageing summary, and the tiles that need attention.
§ 02One-time setup (admin)
Make sure the school's term calendar exists in School Admin — Finance bills per term.
In Finance Settings, create your fee categories (Tuition, PTA, Transport, Feeding…), marking which are mandatory.
Set the basics: Finance mode (cash or accrual), the approval threshold (adjustments above this amount need an admin's sign-off — counted cumulatively per invoice, so splitting a concession into smaller pieces doesn't skip approval), the fiscal year start month, and your receipt prefix (e.g. RCP).
Check the default account mappings (cash, bank, mobile money, receivables, discounts) — sensible defaults exist; change them only if your accountant says so.
Grant your bursars at the bottom of Settings.
§ 03Fee structures — what each class pays
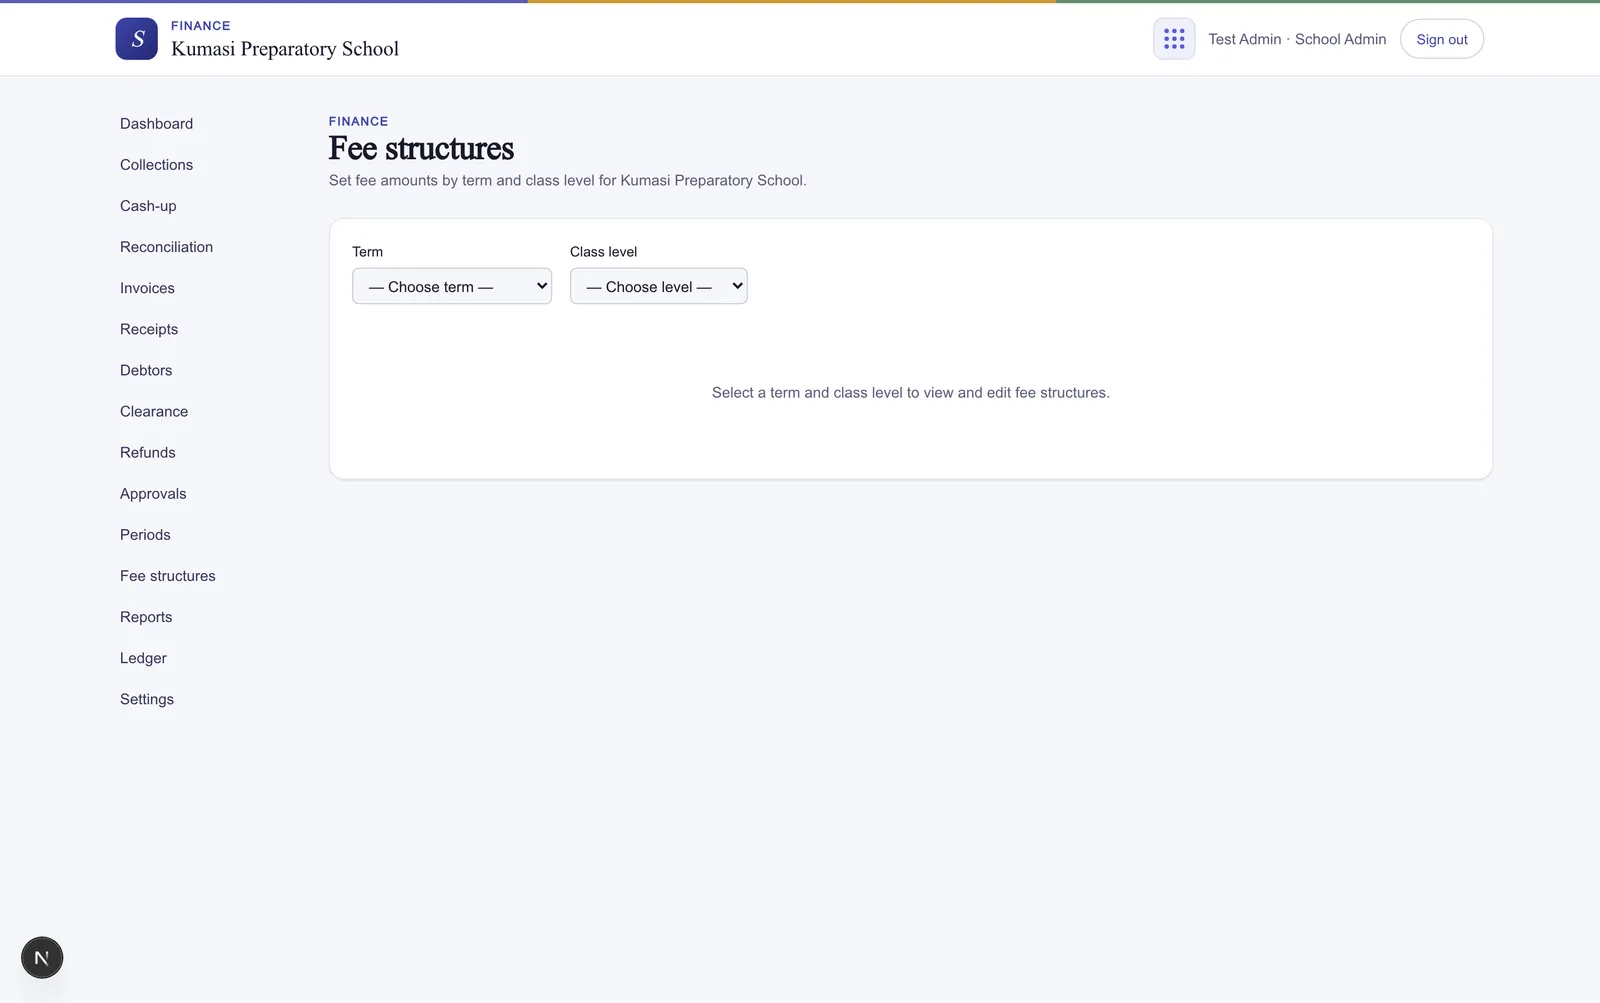
Open Fee structures. Pick the term and the class level.
The grid shows one row per fee category. Type the amount for each (e.g. Tuition 500.00), and Save changes.
Repeat per class level — or use Copy from term to pull last term's amounts across and adjust.
Fig.One row per fee category, per class level. Type the amounts and save.
Changing fees mid-term
If the term already has issued invoices, saving asks for an amendment reason and creates a new dated version of the structure — existing invoices keep their amounts; the change applies going forward. Every change is on the record.
§ 04Billing periods & issuing invoices
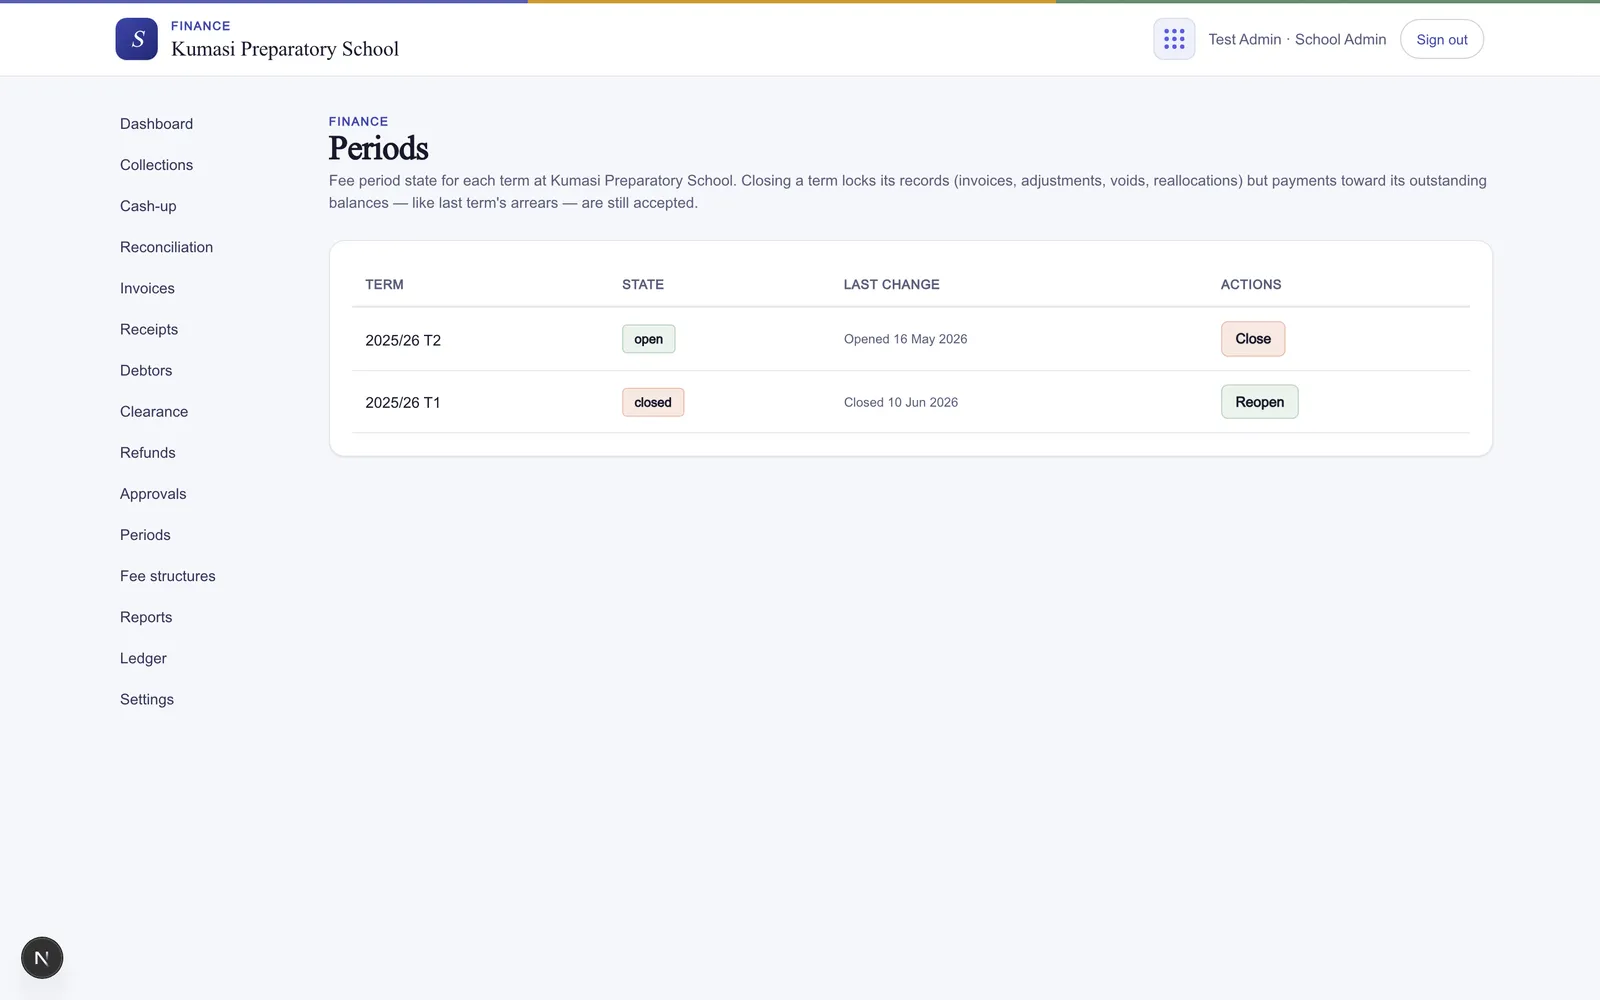
Open Periods. Each term shows its state: Not opened, Open, or Closed.
Press Open on the new term. Confirm — “Opening [Term] will generate draft invoices.” Every enrolled student gets a draft invoice built from your fee structure for their class level.
Go to Invoices, filter to the term, spot-check a few drafts, then press Issue invoices and confirm. Drafts become Issued — now payable, and visible to parents.
At term end, Close the period. Closing freezes the books for that term — no new invoices, and no edits (issuing, cancelling, adjustments, or voiding/reallocating payments). You can still record payments against closed-term invoices, so Term 1 arrears collected during Term 2 don't need anything reopened; the receipt simply posts on today's date. Reopen (which asks for a reason) is only needed when you must edit the closed books, not to collect a late payment.
Fig.Each term carries a state. Open generates the draft invoices; close freezes the books.
§ 05The collections desk — recording a payment
This is the everyday screen. A parent arrives at the office with money; here's the minute it takes:
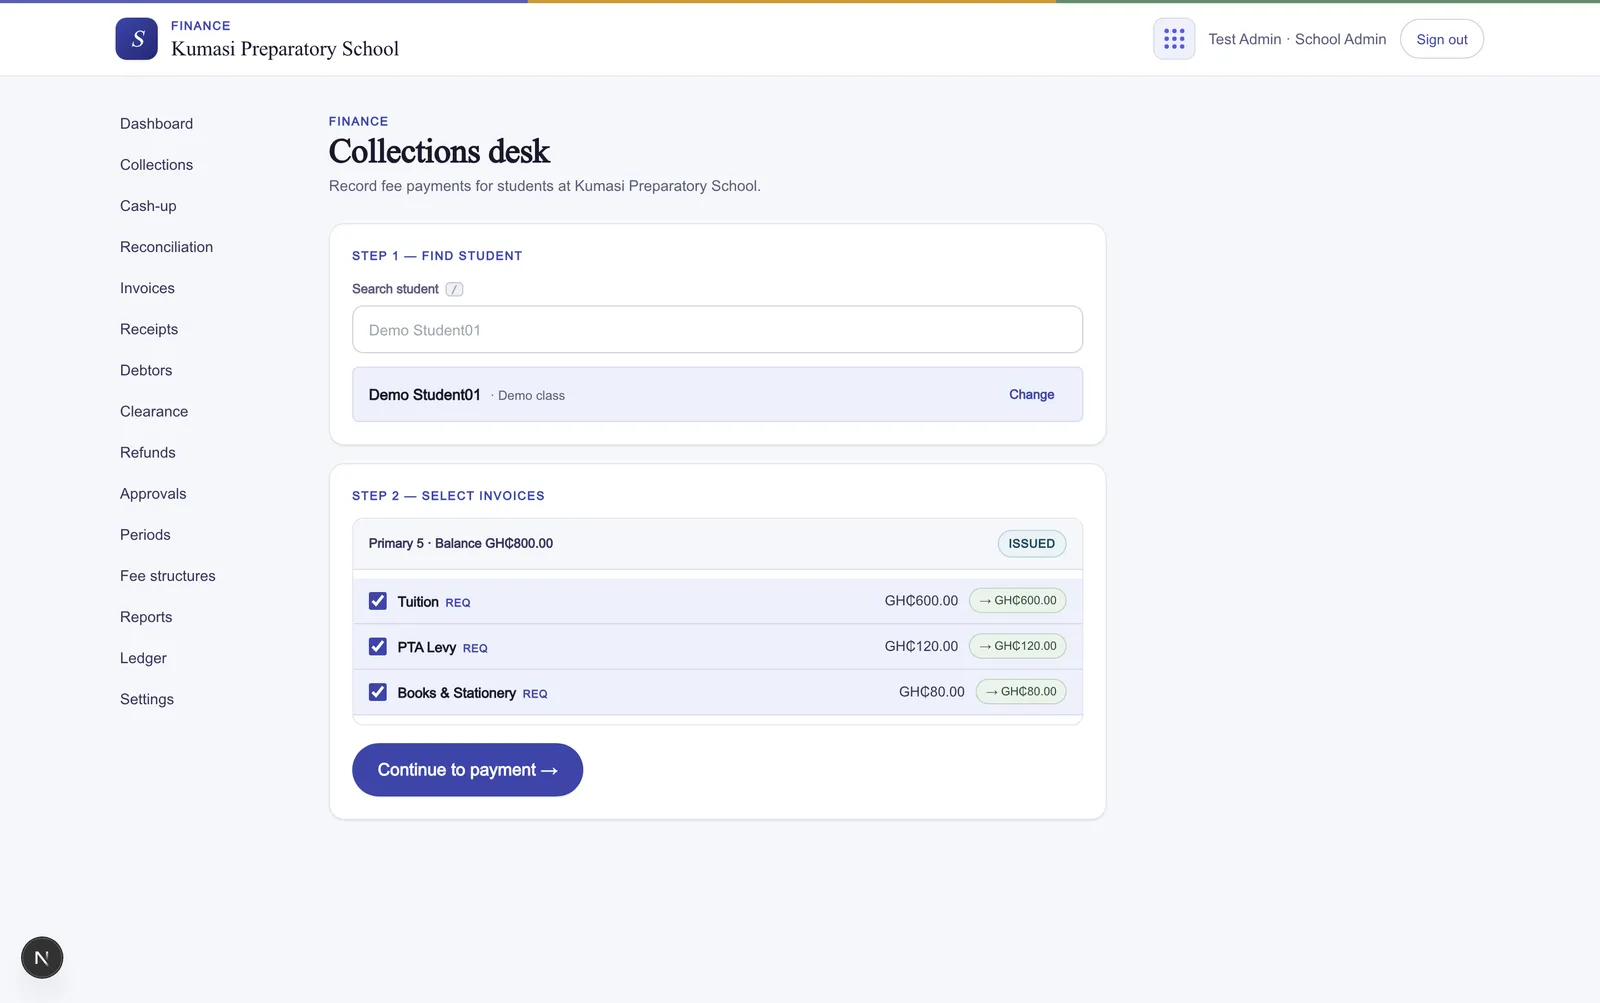
Open Collections. In Step 1 — Find student, type a name or student code (tip: press / anywhere to jump to the search box). Pick the student — their class and any balance show right in the results.
Step 2 — Select invoices. Outstanding invoices appear with every line pre-ticked, oldest first. Untick anything the parent isn't paying today. Press Continue to payment →. (No invoices? The button reads Record prepayment — the money sits as credit on the student.)
Step 3 — Record payment. Enter the Amount (GHS), the Payment method — Cash, Bank transfer, Mobile money (then pick the network: MTN Mobile Money, Telecel Cash (formerly Vodafone), AT Money (AirtelTigo)), or Cheque — the reference (optional for cash and mobile money; required for bank transfers — the teller/transfer reference — and cheques — the cheque number), and the received time (pre-filled). The allocation preview shows exactly how the amount spreads across the selected lines.
Press Record payment (or Ctrl+Enter).
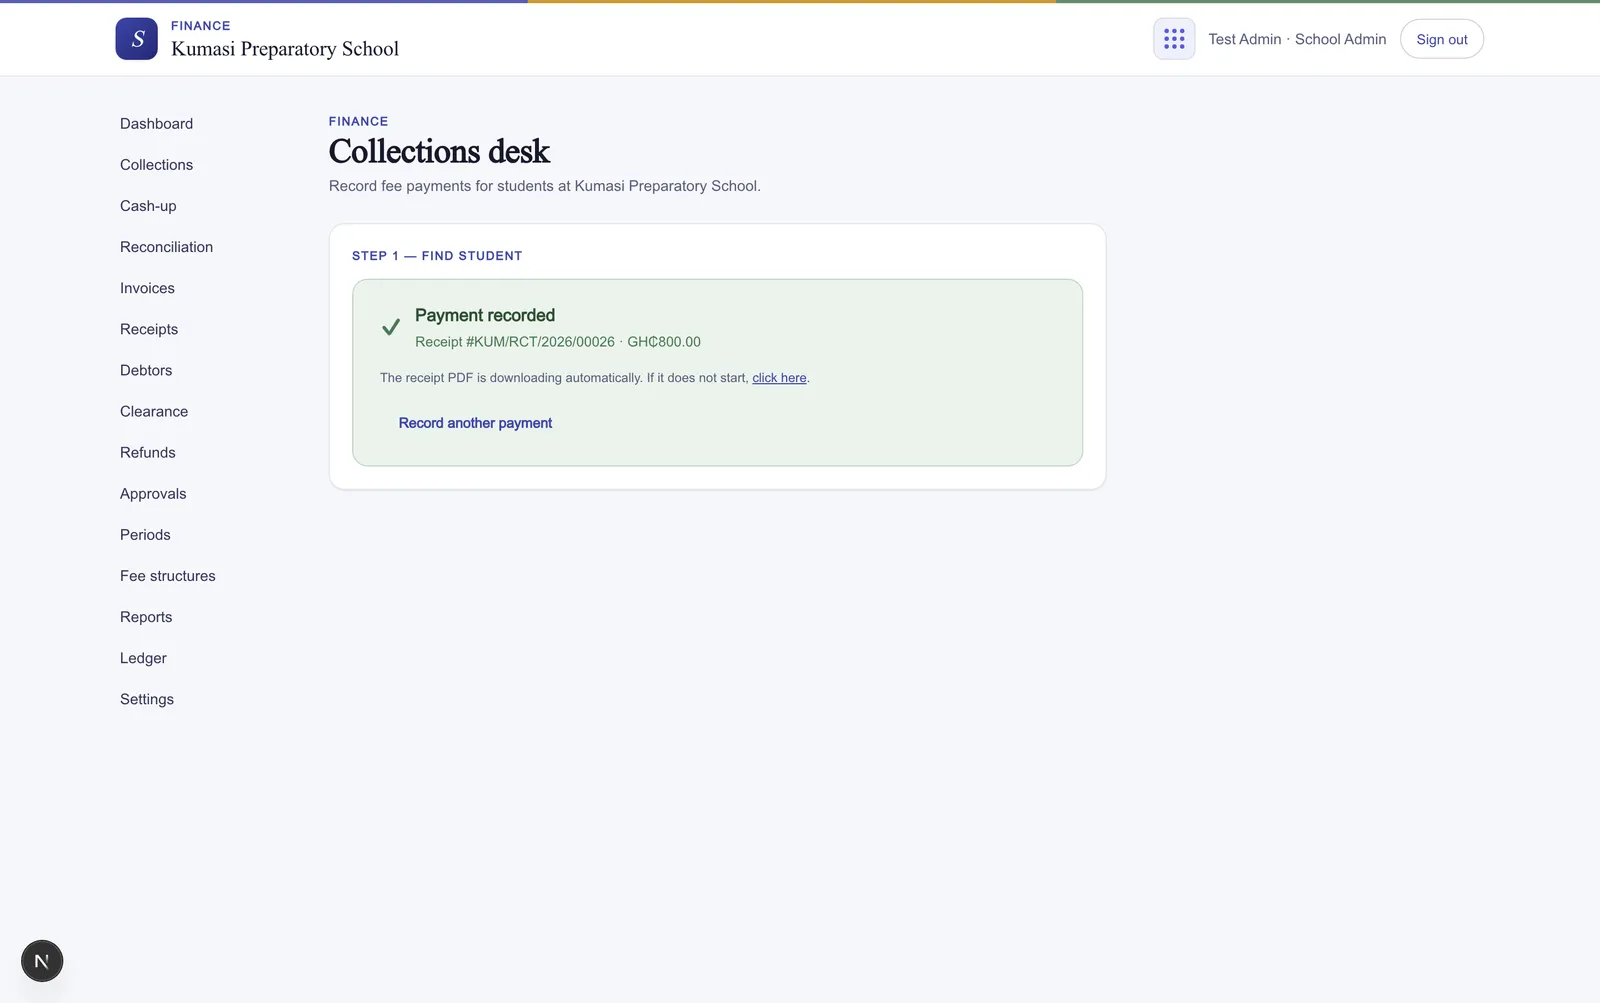
Done: “Payment recorded — Receipt #RCP-001234 · GHS 250.00”, and the receipt PDF downloads itself. Print or WhatsApp it to the parent. Press Record another payment for the next person in line.
Fig.Find → select → record. The allocation preview shows how the amount spreads across the lines.
Allocation, automatically
Money is applied to the oldest invoice first, mandatory lines first — partial payments land where they should without you doing the arithmetic.
Fig.The numbered receipt PDF downloads itself — print it or WhatsApp it to the parent.
§ 06Working with invoices
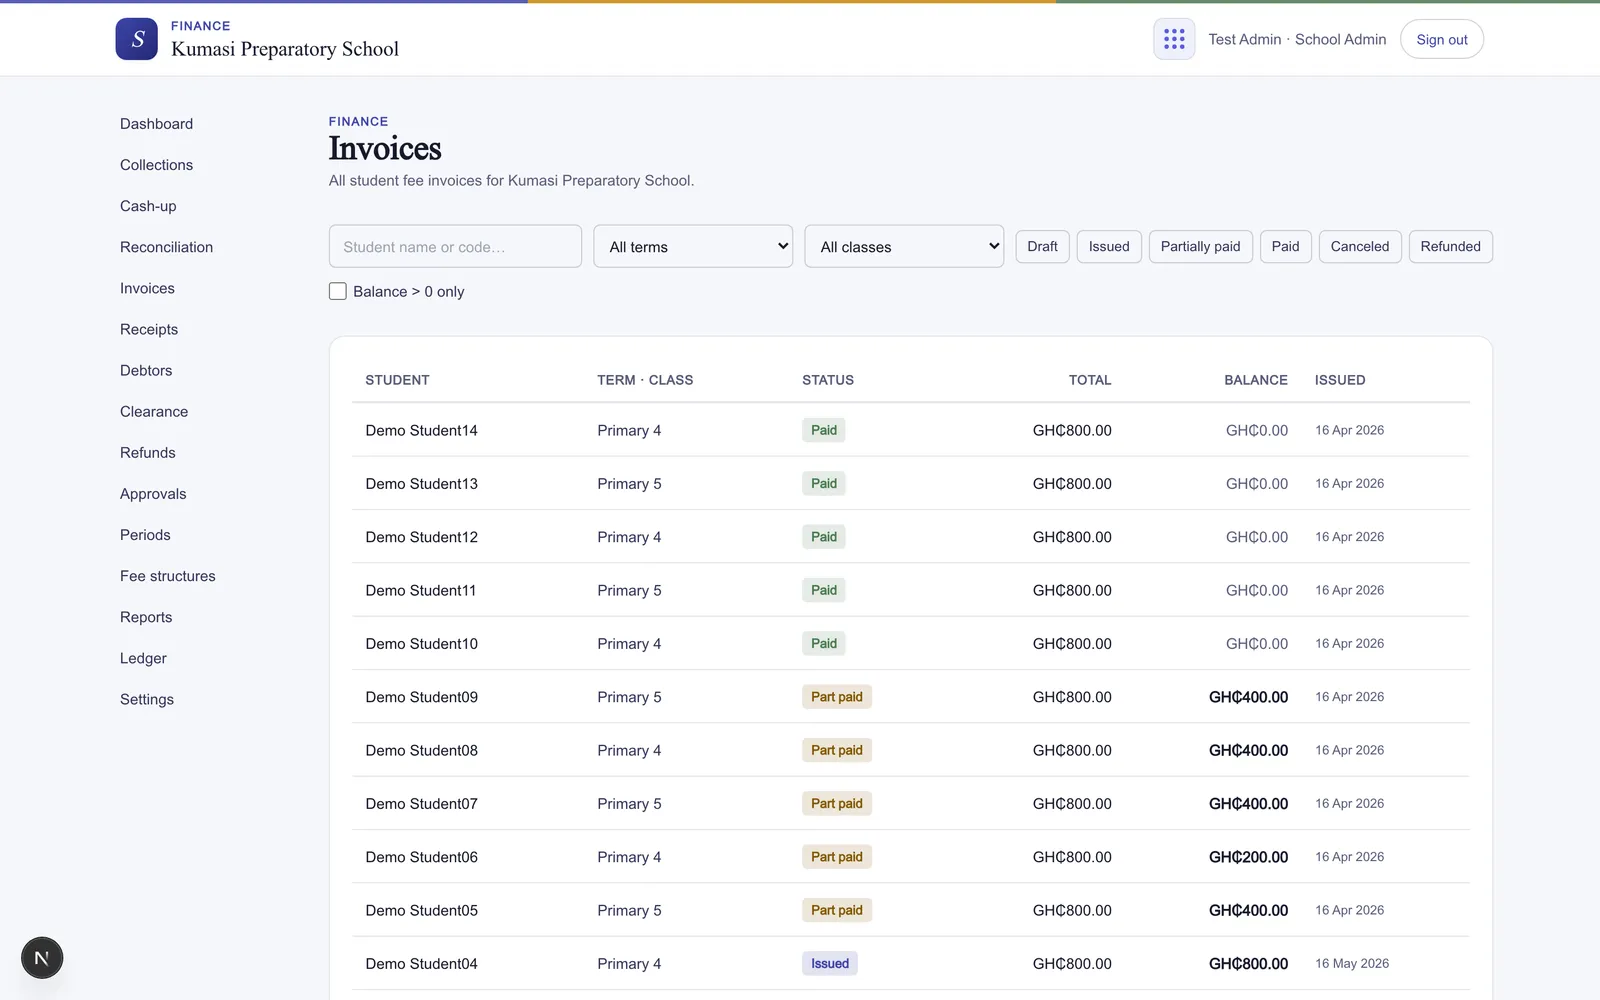
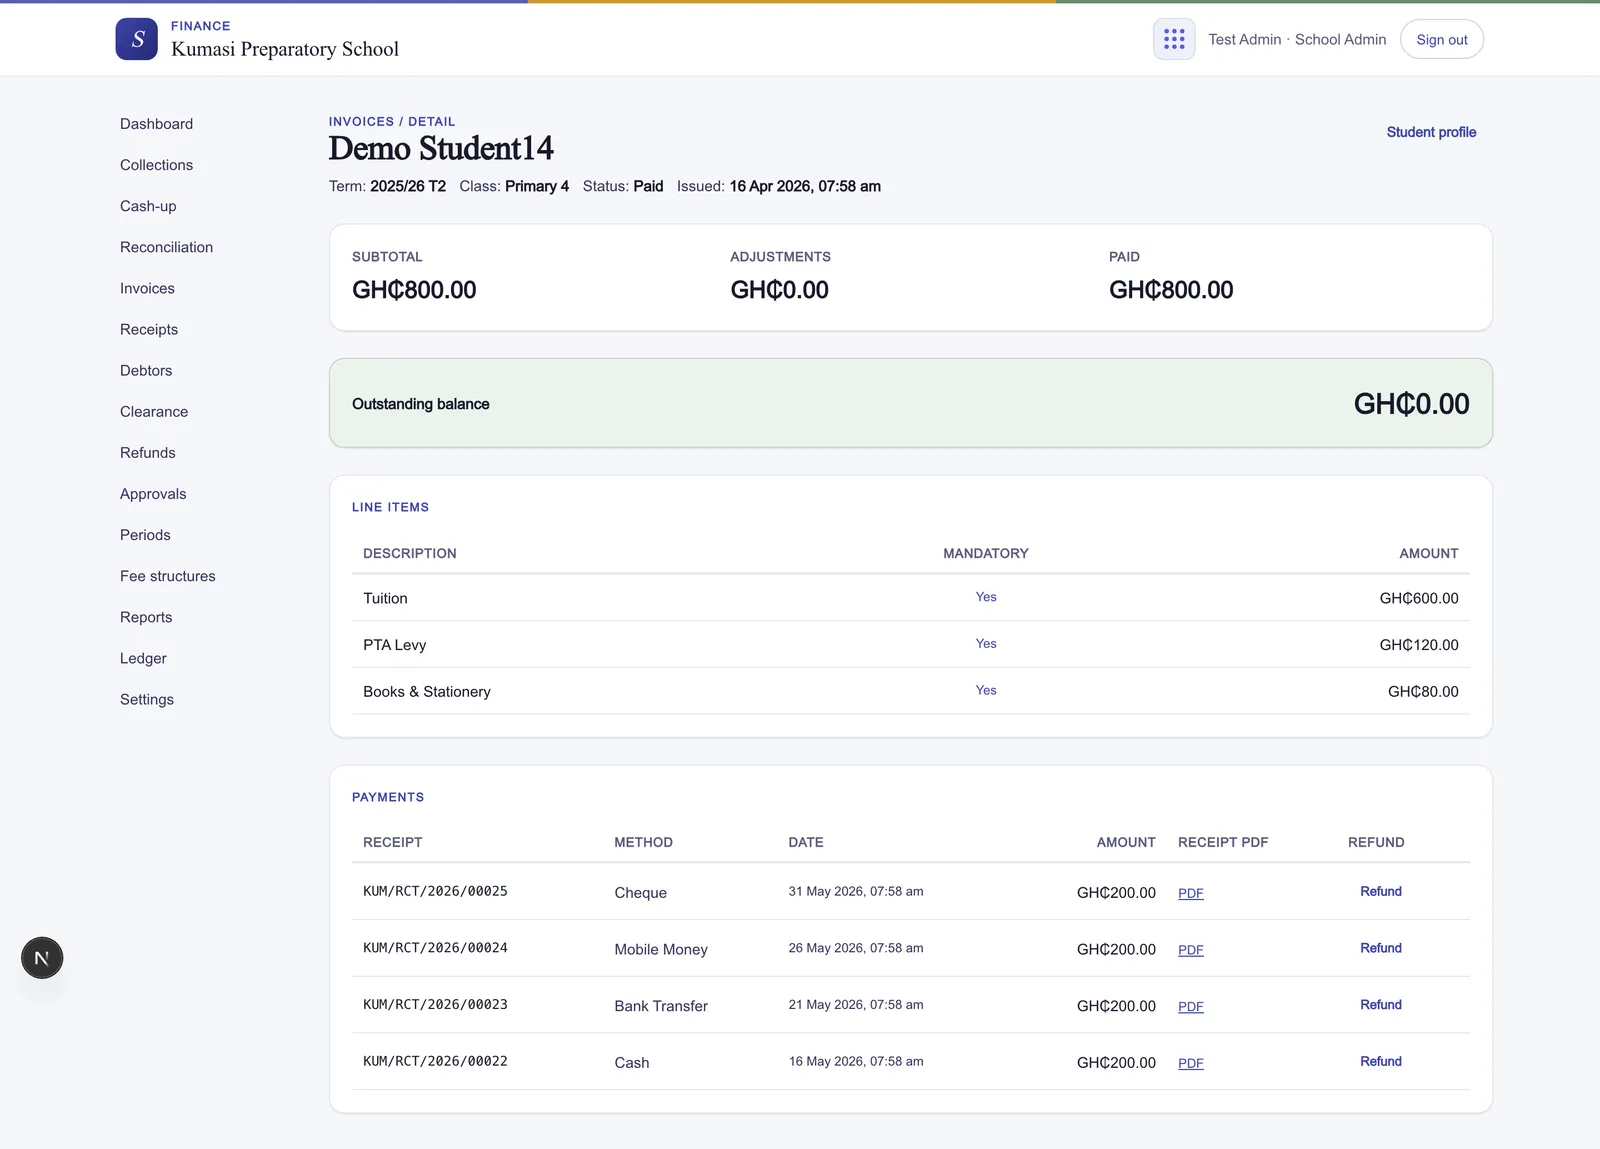
Invoices lists everything, filterable by term, class level, status (Draft / Issued / Part paid / Paid / Canceled / Refunded), “balance only”, and free-text search. Open an invoice to see its lines, every payment applied, any adjustments, and the running balance.
Cancel a draft or issued invoice that shouldn't exist (e.g. a withdrawn student).
Request refund on a paid invoice routes through approvals.
Fig.Every invoice, filterable by term, class level, status, and balance.Fig.An open invoice — lines, payments applied, adjustments, and the running balance.
§ 07Waivers, discounts & approvals
Reduce a student's bill the controlled way — never by editing numbers in place. An adjustment is requested (kinds: Discount, Scholarship, Waiver, Refund, Reversal) with a reason; anything above the approval threshold — measured across all adjustments on the invoice, not just the latest one — waits for an admin.
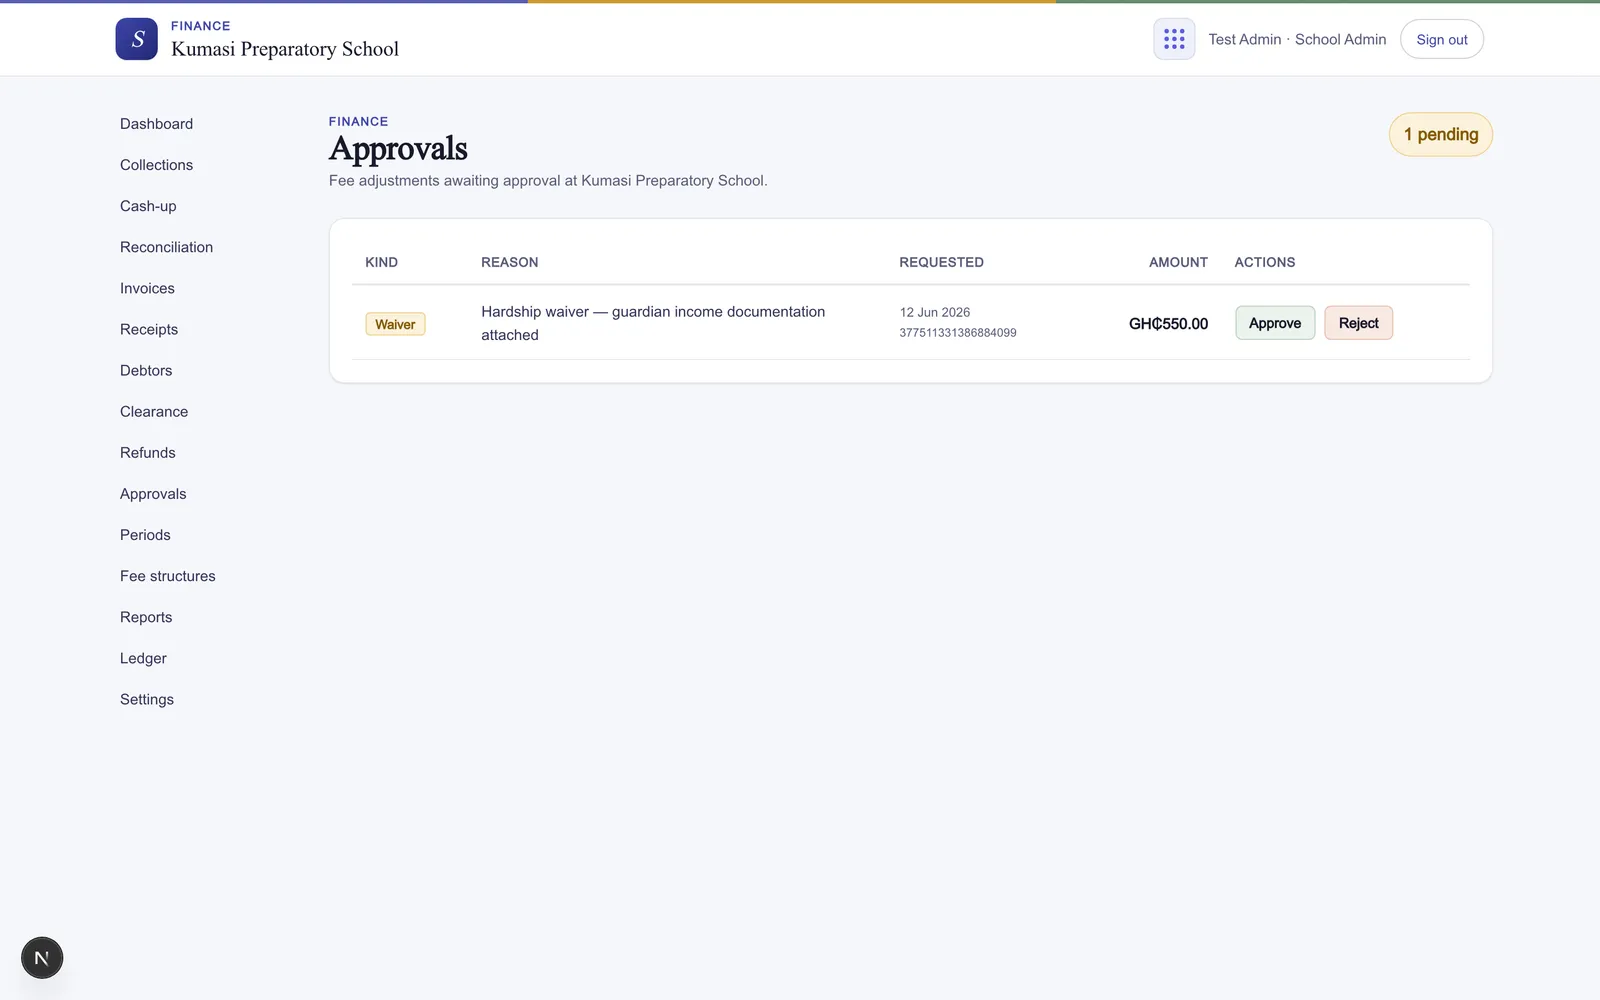
Admin opens Approvals — pending requests are listed with kind, reason, requester, and amount.
Press Approve (optional note) or Reject (reason required), then confirm.
Approved adjustments apply to the invoice and appear in the audit trail; rejected ones return to the requester with your reason.
Fig.Pending requests with kind, reason, requester, and amount — approve or reject with a note.
§ 08Reports
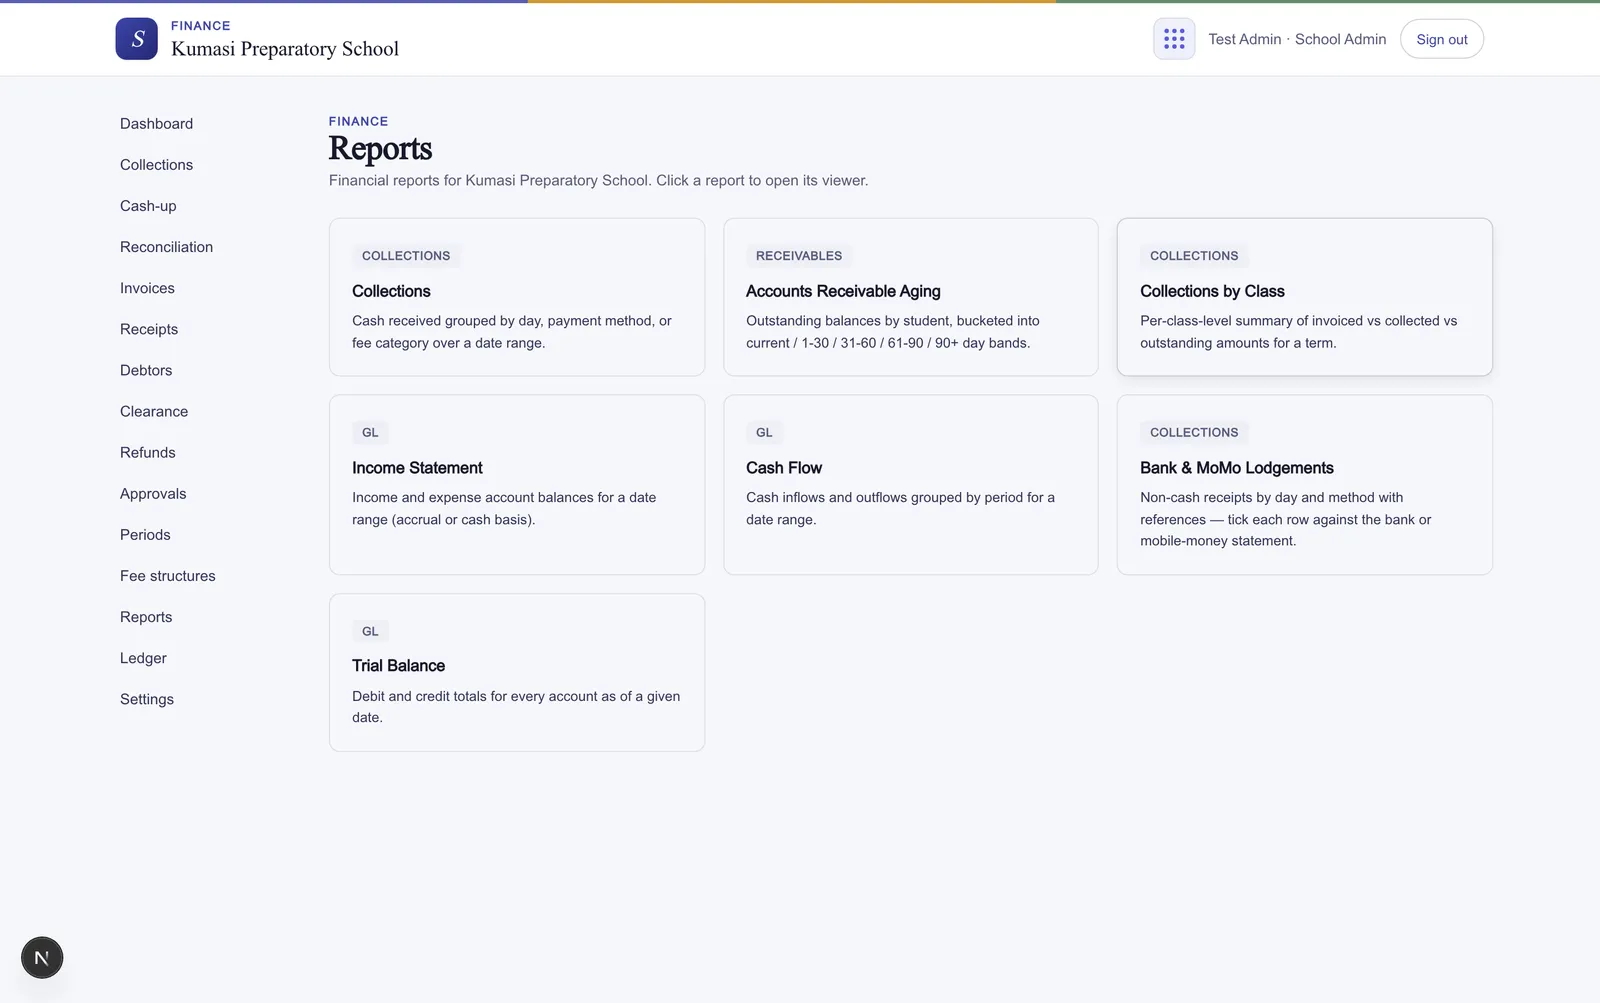
Seven reports, each a click from Reports:
Report
Answers
Collections
Cash received by day, method, or fee category over a date range.
Accounts Receivable Aging
Who owes what, bucketed current / 1–30 / 31–60 / 61–90 / 90+ days.
Collections by Class
Per class level: invoiced vs collected vs outstanding for a term.
Income Statement
Income and expenses for a date range (accrual or cash basis).
Cash Flow
Cash in and out, grouped by period.
Bank & MoMo Lodgements
Non-cash receipts by day and method with references — tick each row against the bank or mobile-money statement.
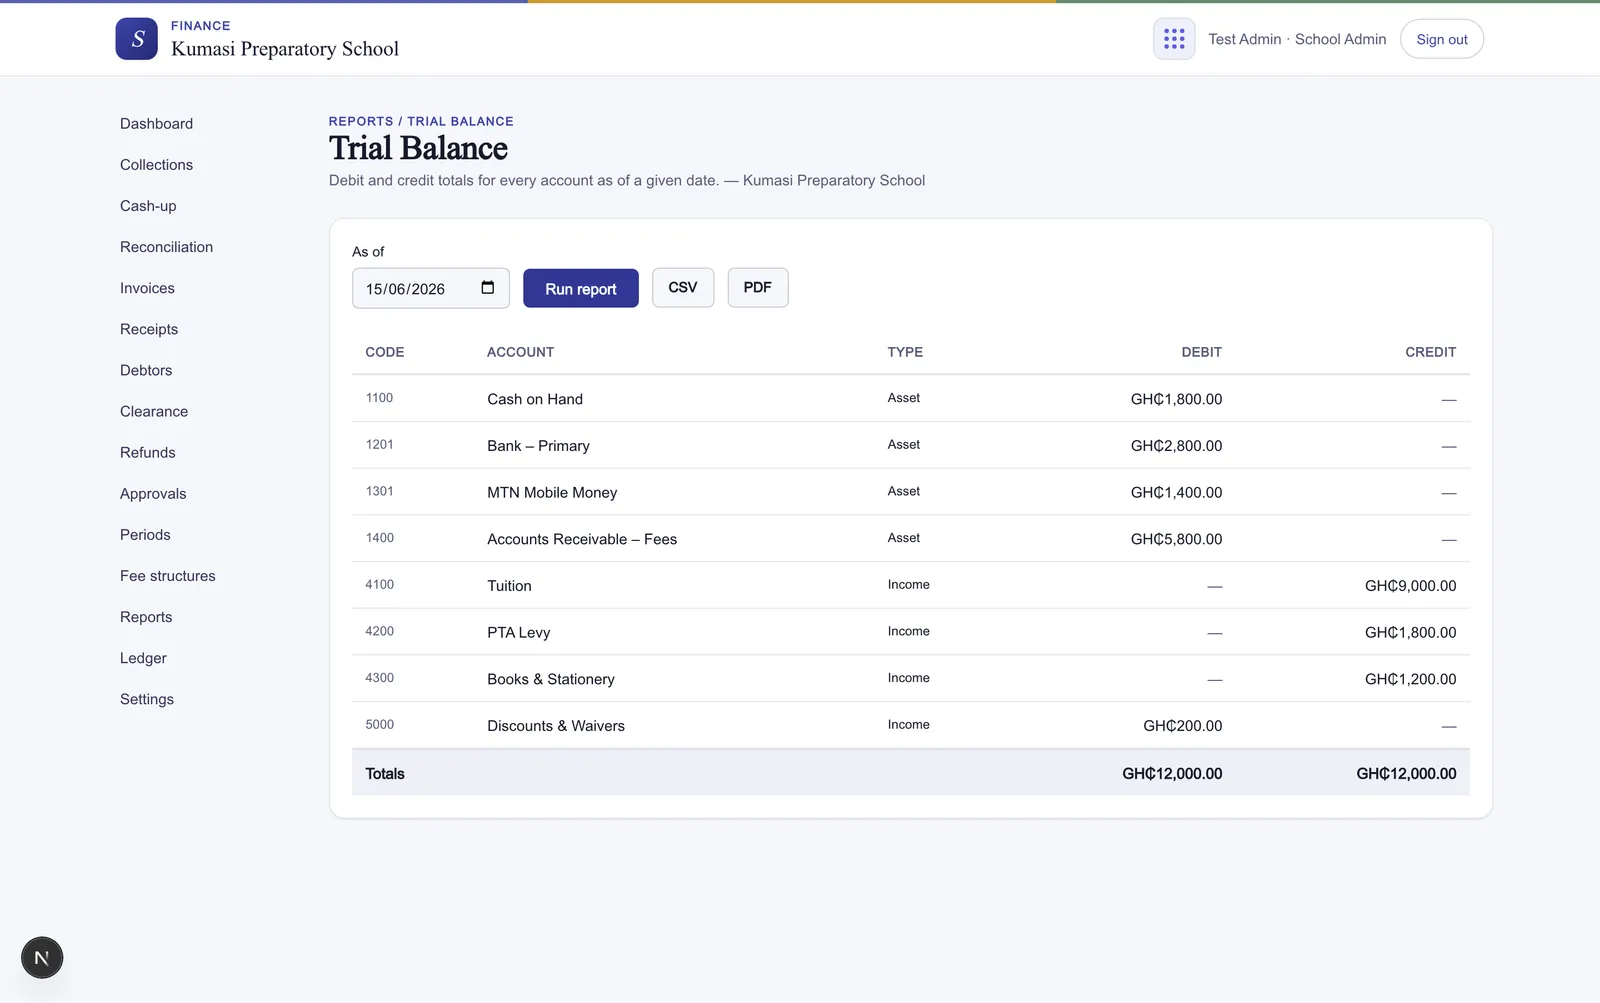
Trial Balance
Debits and credits for every account as of a date.
Fig.Seven reports, each a click away, with date-range and grouping controls.Fig.The Trial Balance — debits and credits for every account, as of a date.
§ 09The ledger (admin)
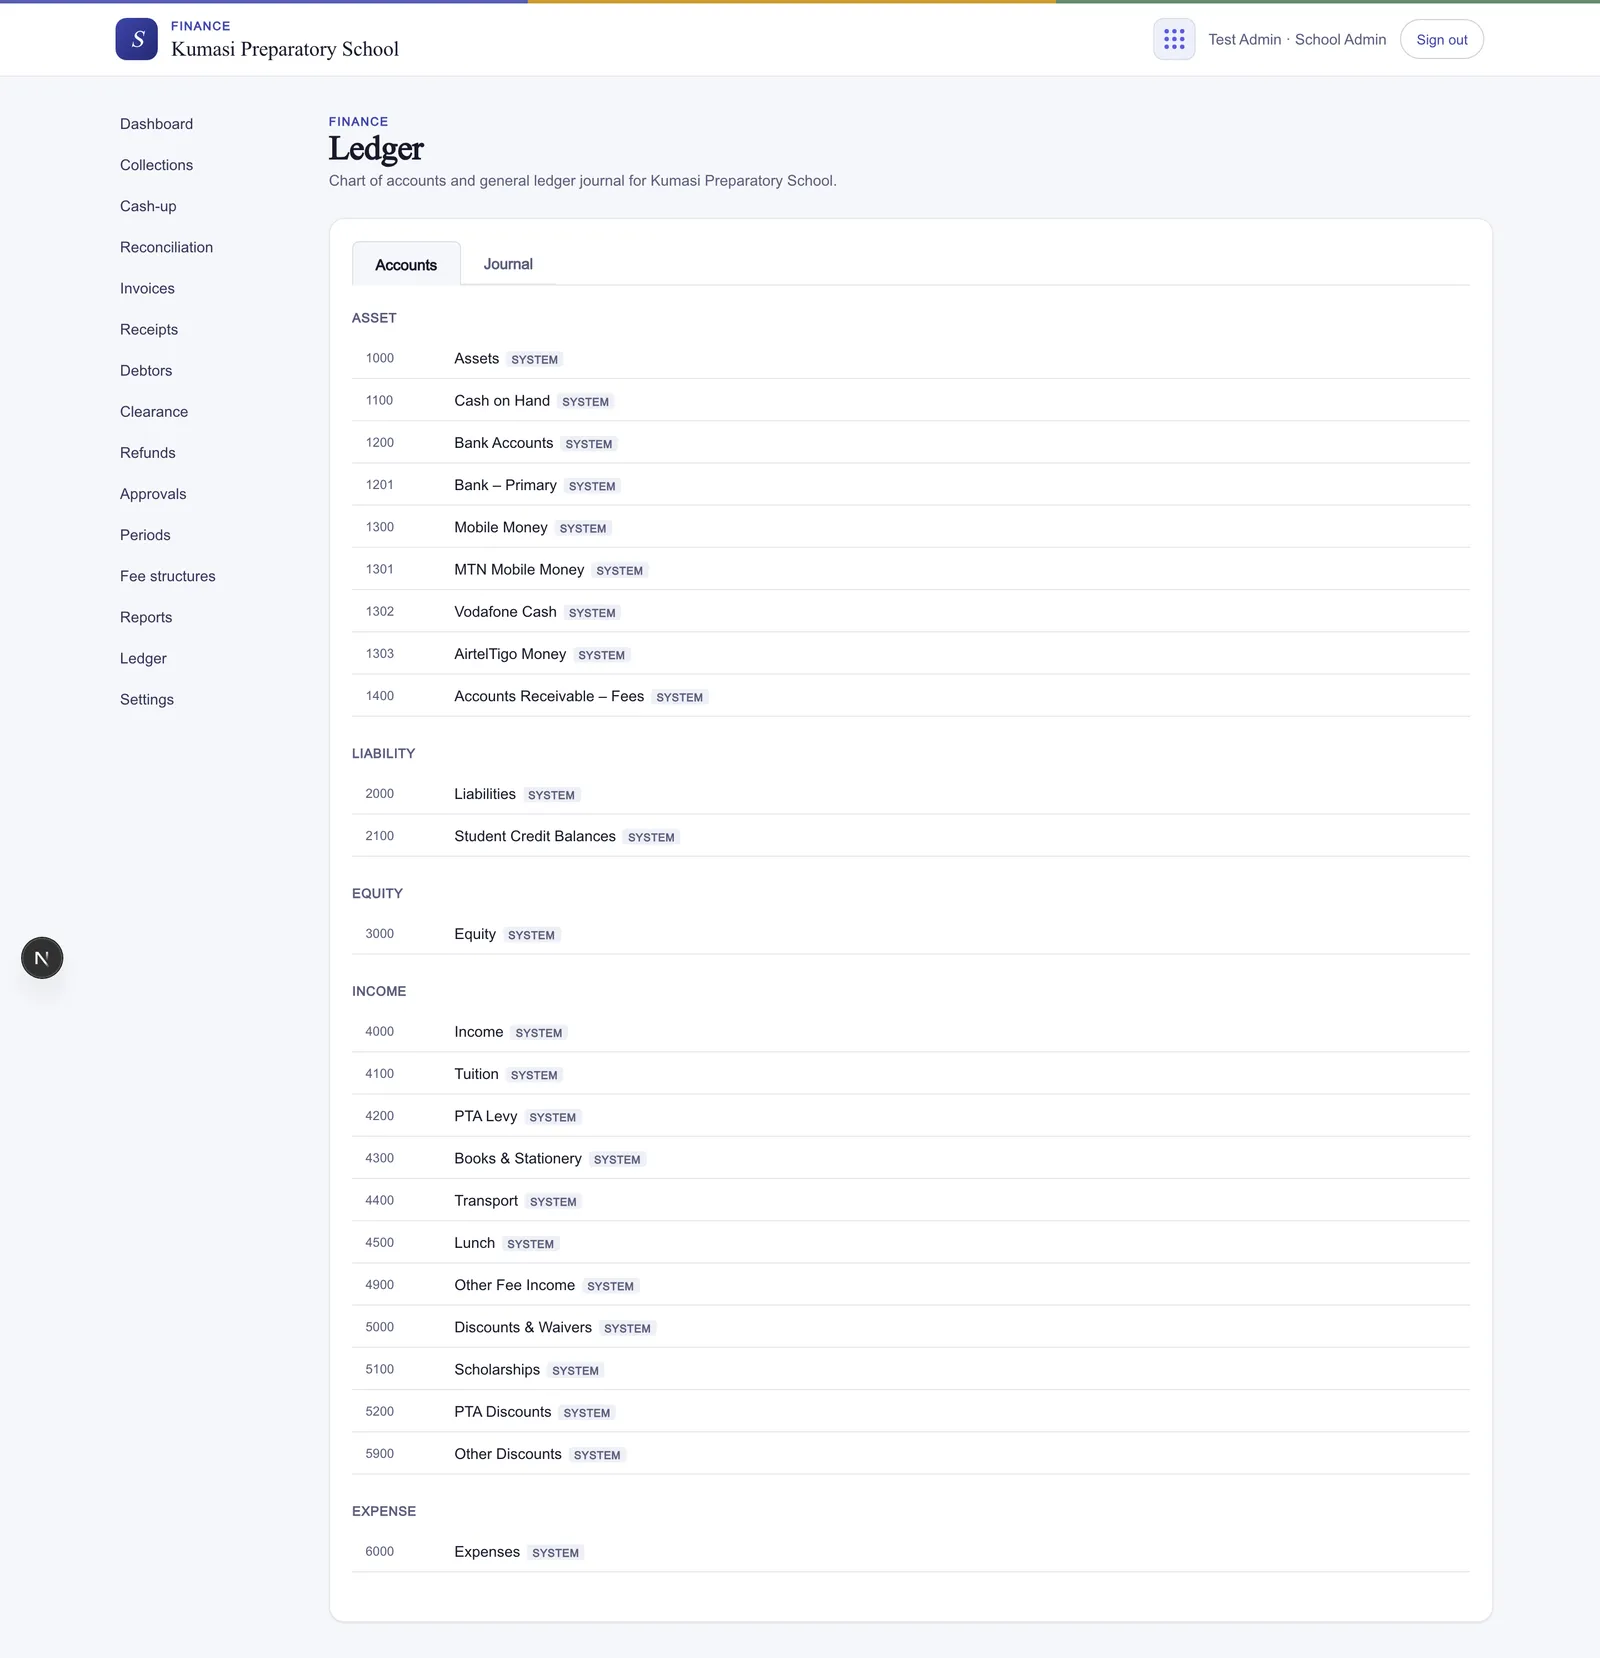
Ledger is the accounting layer behind it all: the Accounts tab (chart of accounts with live balances) and the Journal tab (every entry, double-entry style). Mistakes aren't deleted — press Reverse on an entry to post a clean reversing entry. Your auditor will thank you.
Fig.Accounts and the double-entry journal. Reverse an entry rather than deleting it.
§ 10What parents and students see
Parents — invoices, statuses, balances, payment history with downloadable receipts, and a full statement PDF in the Parent Portal. Updates the moment you record a payment.
Students — only a small read-only fees tile (“✓ Settled” or the outstanding amount) with a note that their guardian handles payment.
§ 11Daily cash-up
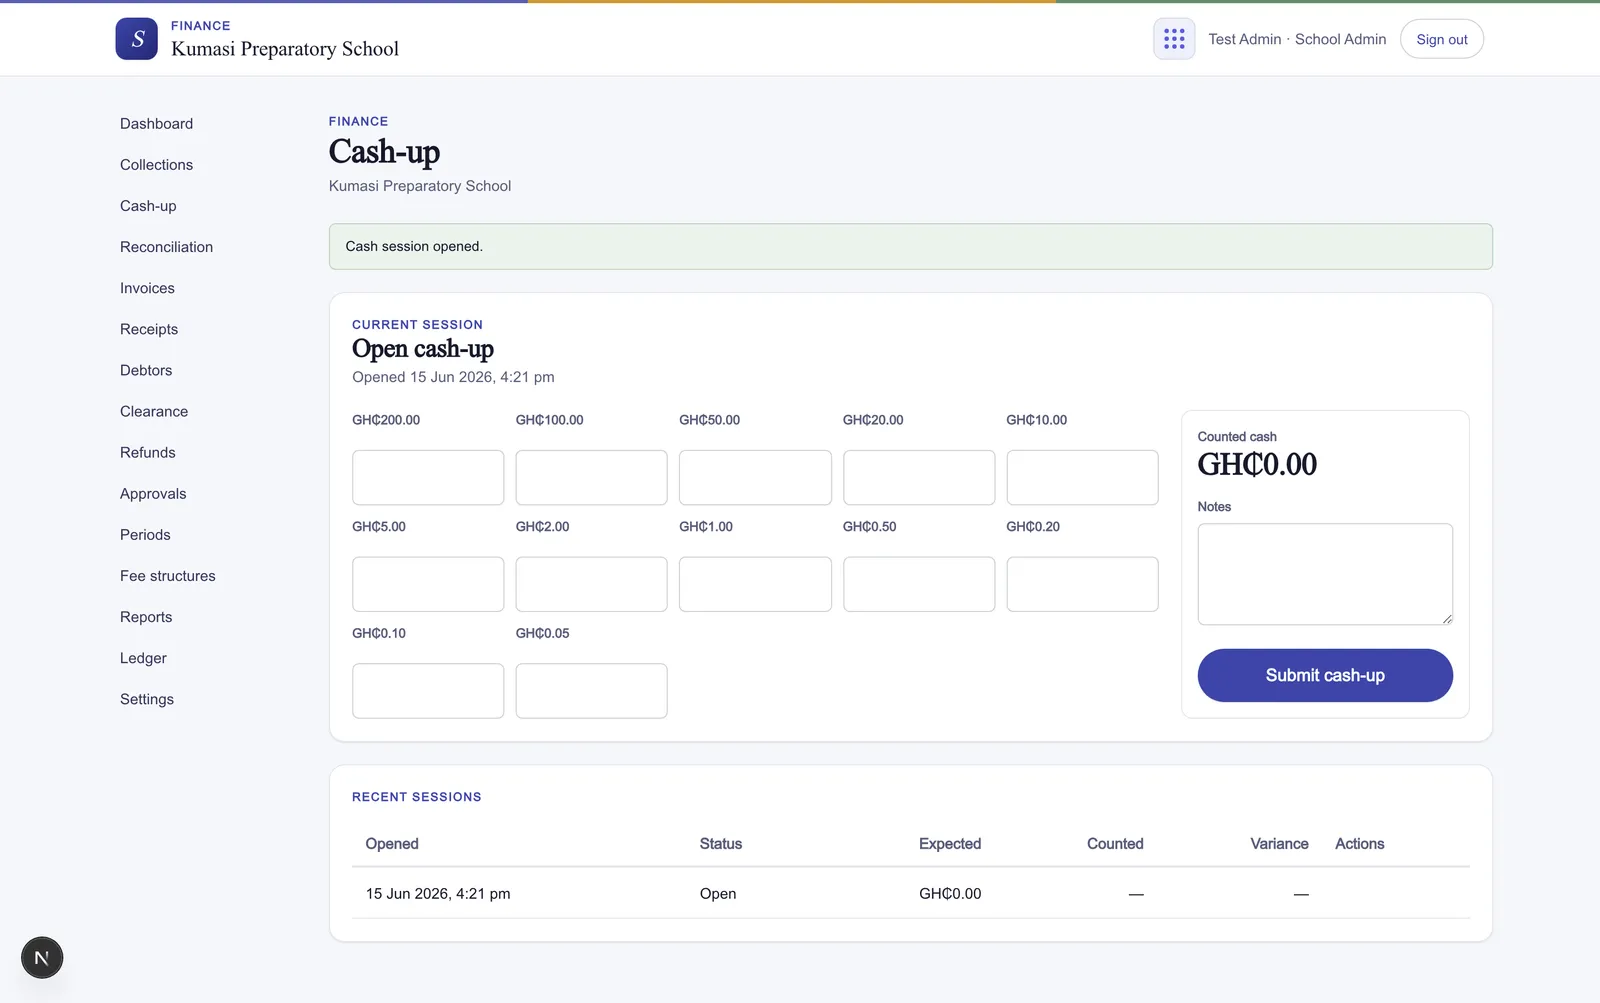
At the end of the day a bursar reconciles the drawer against what the system recorded. Open Cash-up and press Open session.
Count the drawer into the denomination grid — a row for each note and coin from GHS 200 down to 0.05. The grid totals as you go into a Counted cash figure.
Add any Notes (a float left in, a shortfall you can explain), then press Submit cash-up. The session leaves your hands and waits for an admin.
An admin reviews it under Recent sessions — each row shows Opened, Status, Expected (what the system recorded), Counted, and the Variance between them. They press Approve, Reject, or Reopen to send it back for a recount.
State
Meaning
open
Session started; the bursar is still counting.
submitted
Counted and sent for an admin to review.
approved
Admin accepted the count; the day is reconciled.
rejected
Admin declined it — recount or fix, then resubmit.
Fig.Count into the grid, submit, and the admin reviews Expected vs Counted in Recent sessions.
§ 12Bank & mobile-money reconciliation
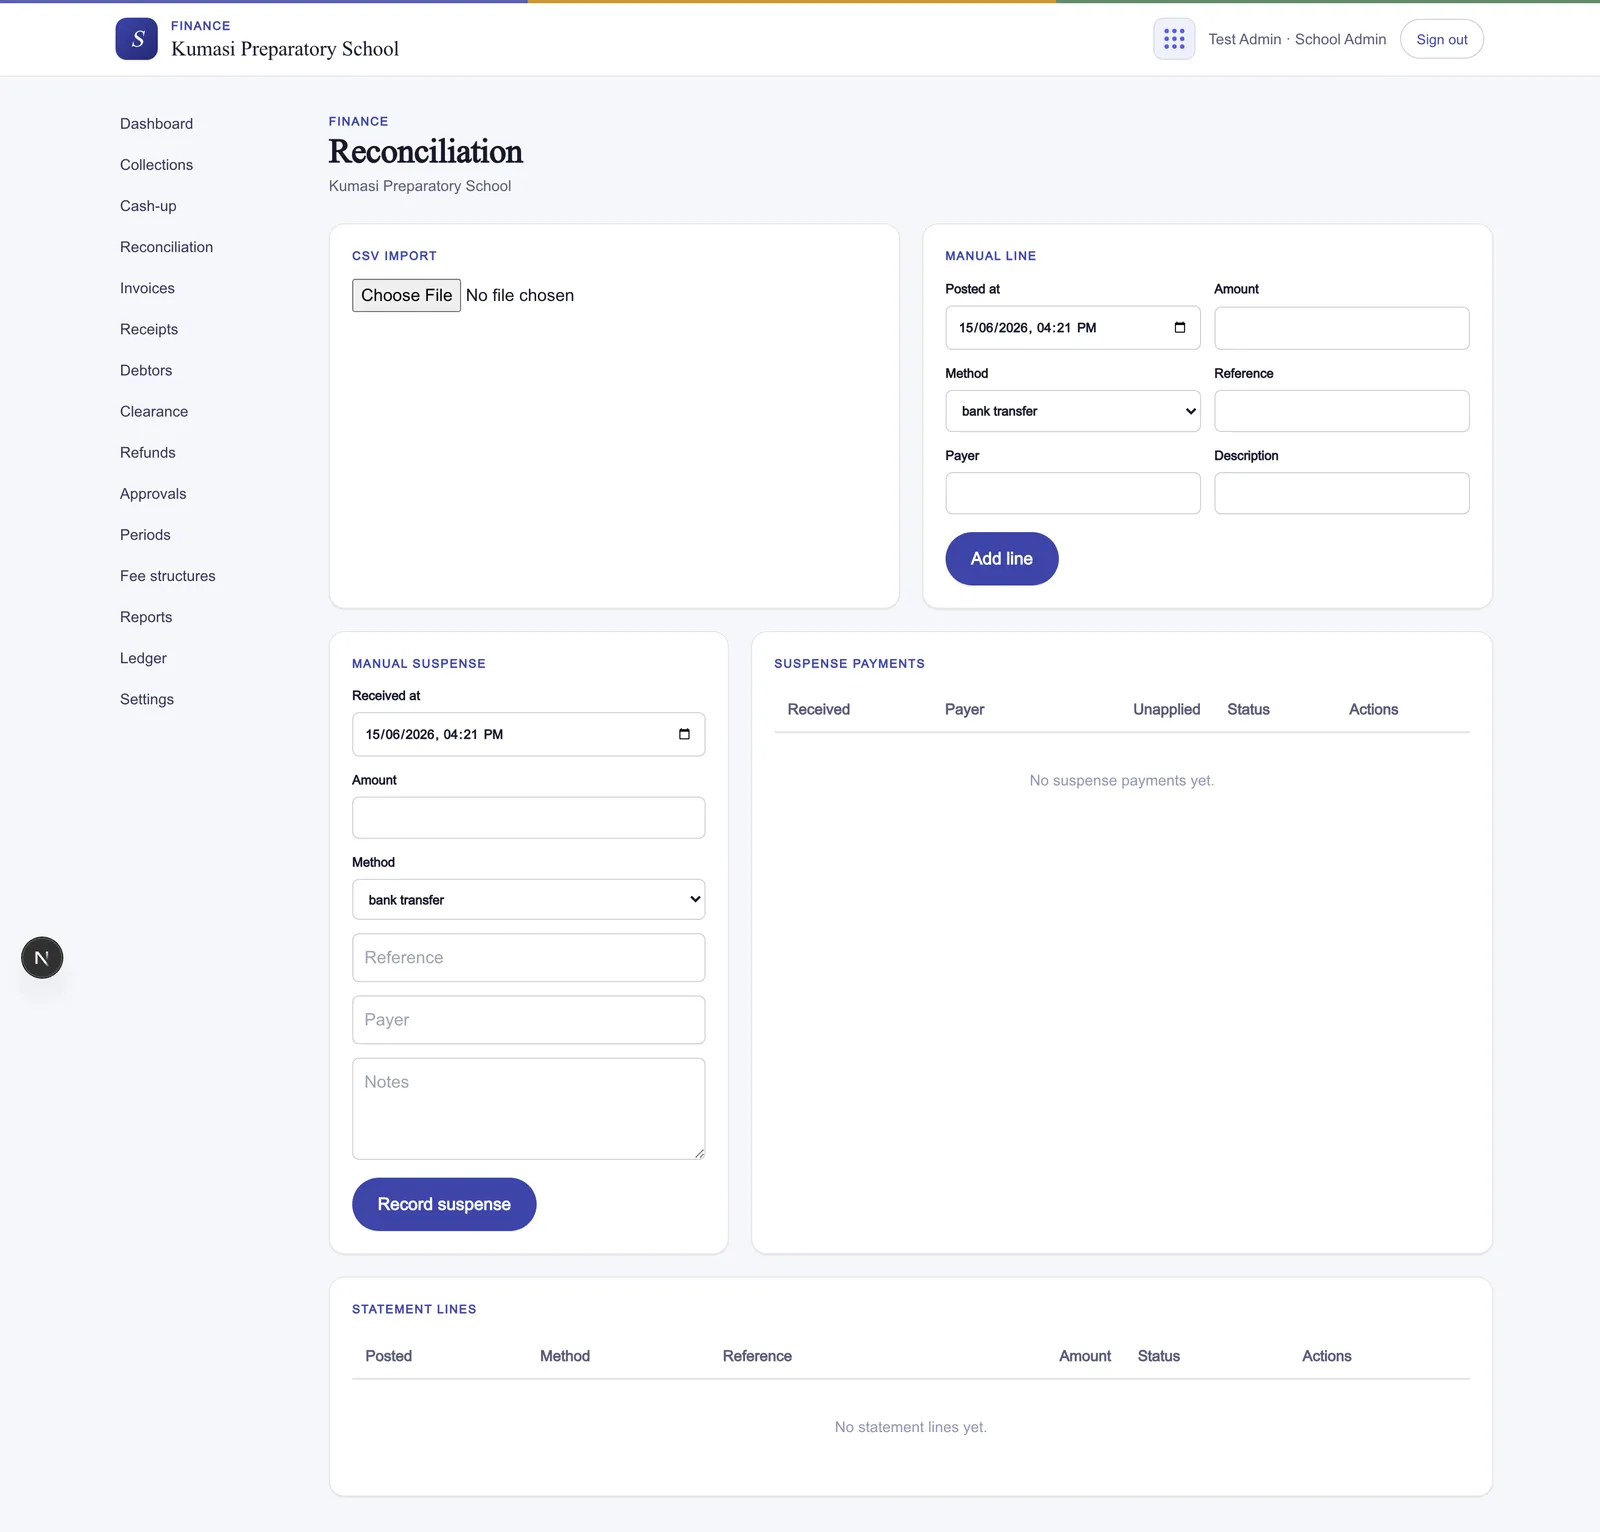
Cash you count at the desk; bank and mobile-money receipts you match against the statement. Open Reconciliation.
Import the statement. Upload a CSV from your bank or MoMo merchant portal, map the columns (date, amount, reference, description), then press Import {N} rows.
Match the lines. Each imported line sits next to its likely payment. Press Match payment to tie it to a recorded receipt, Suspense to park a line you can't place yet, or Dismiss a line that isn't a fee (a bank charge, an unrelated transfer).
Clear suspense. Money that arrived without a name lands in suspense. Press Record suspense to log it, then Apply once you've worked out which student it belongs to.
Why bother
A clean reconciliation means the Cash Flow and Trial Balance reports agree with your actual bank balance — the question every proprietor and auditor asks.
Fig.Import a statement CSV, match each line to a payment, and clear suspense once you place it.
§ 13Debtors & reminders
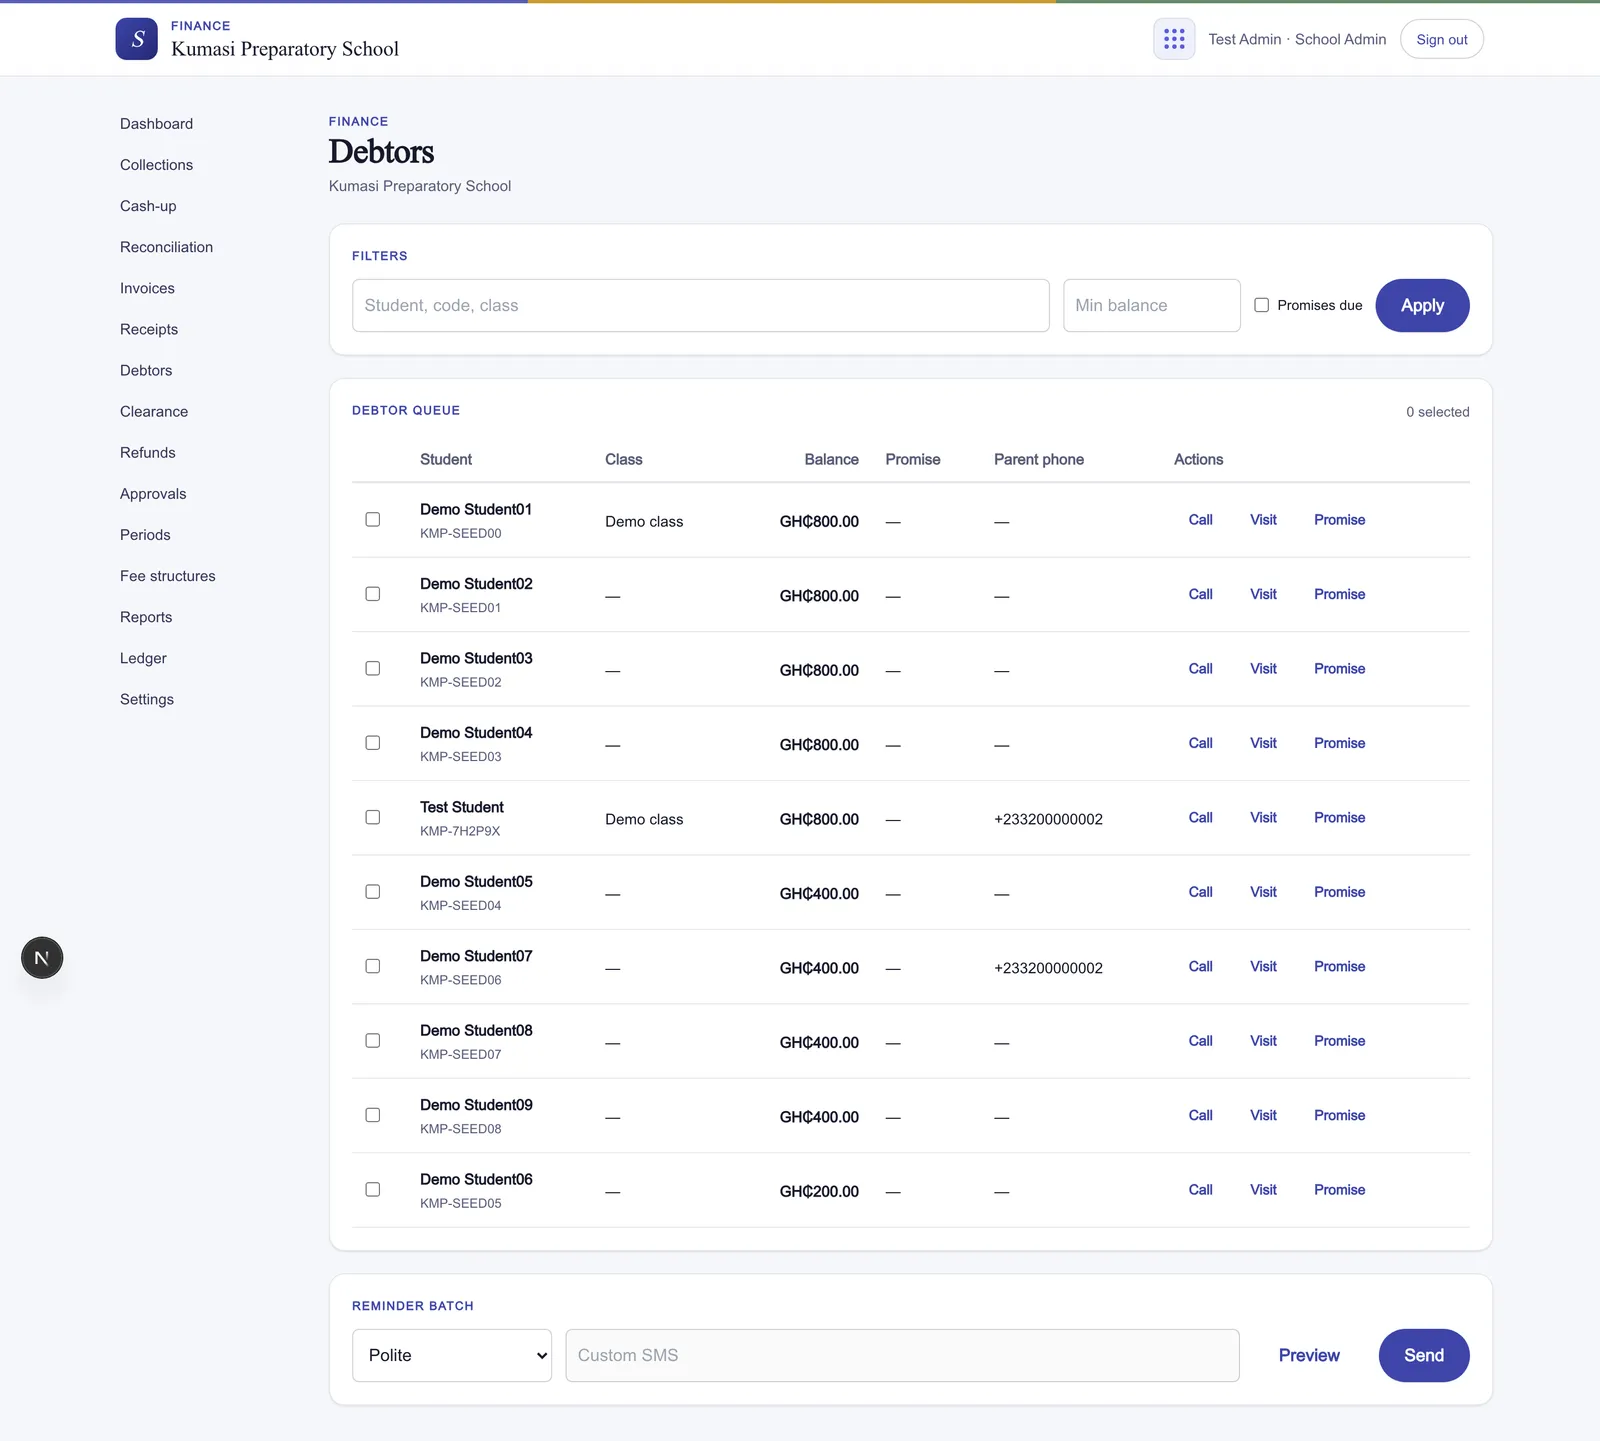
Open Debtors for the live list of who owes what — and the fastest way to chase it.
Filter the list by Min balance (hide the small change) and Promises due (the families who said they'd pay by a date that has now arrived).
Log a touch per row — Call, Visit, or record a Promise with a date — so the next person at the desk sees the history.
Send a reminder batch. Pick a tone — Polite, Firm, Final, or Custom — Preview the message merged with each family's balance, then Send. Reminders go out over SMS.
Fig.Outstanding balances with per-row follow-up and tone-graded reminder batches.
§ 14Student clearance
Many schools gate exams, report cards, and other milestones on fees being settled. Clearance turns that policy into a one-press check.
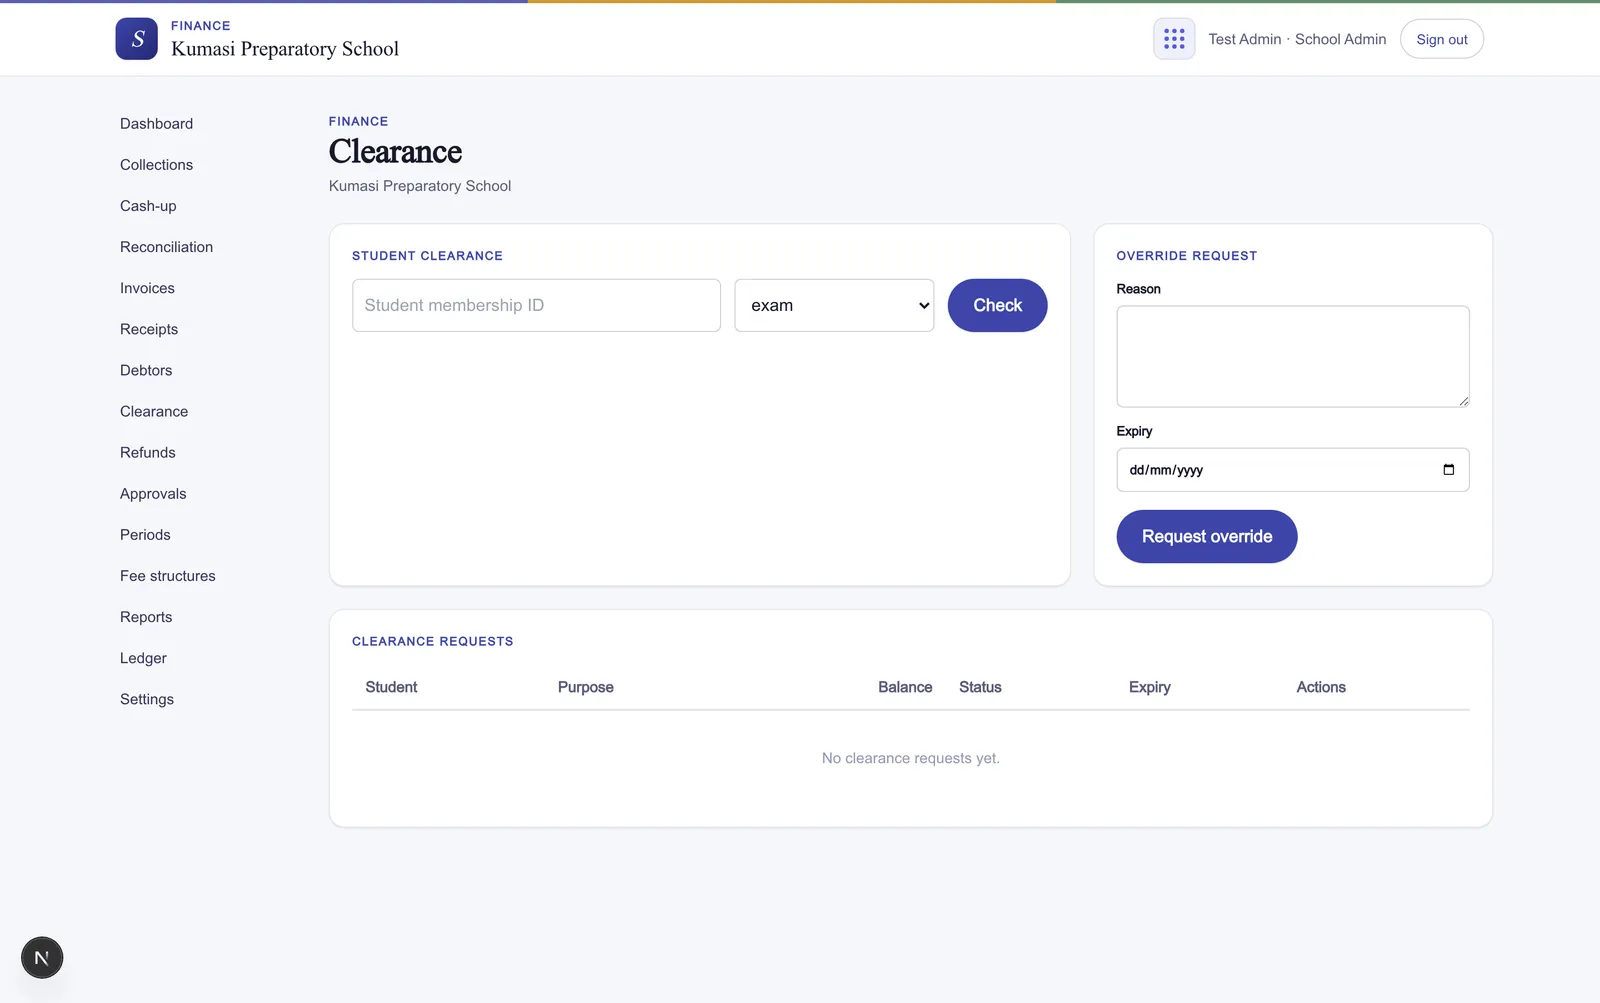
Press Check on a student and pick a Purpose — exam, report card, transfer letter, graduation, reenrollment, or exeat card. You get back Cleared (paid up for that purpose) or Blocked (with the outstanding amount).
If a family has a genuine reason, press Request override — give a Reason and an Expiry so the exception doesn't outlive the term.
An admin reviews overrides and presses Approve or Reject. A cleared (or validly overridden) student can be handed a Certificate PDF as proof.
Fig.Check a student against a purpose — Cleared or Blocked — with overrides and a certificate.
§ 15Refunds
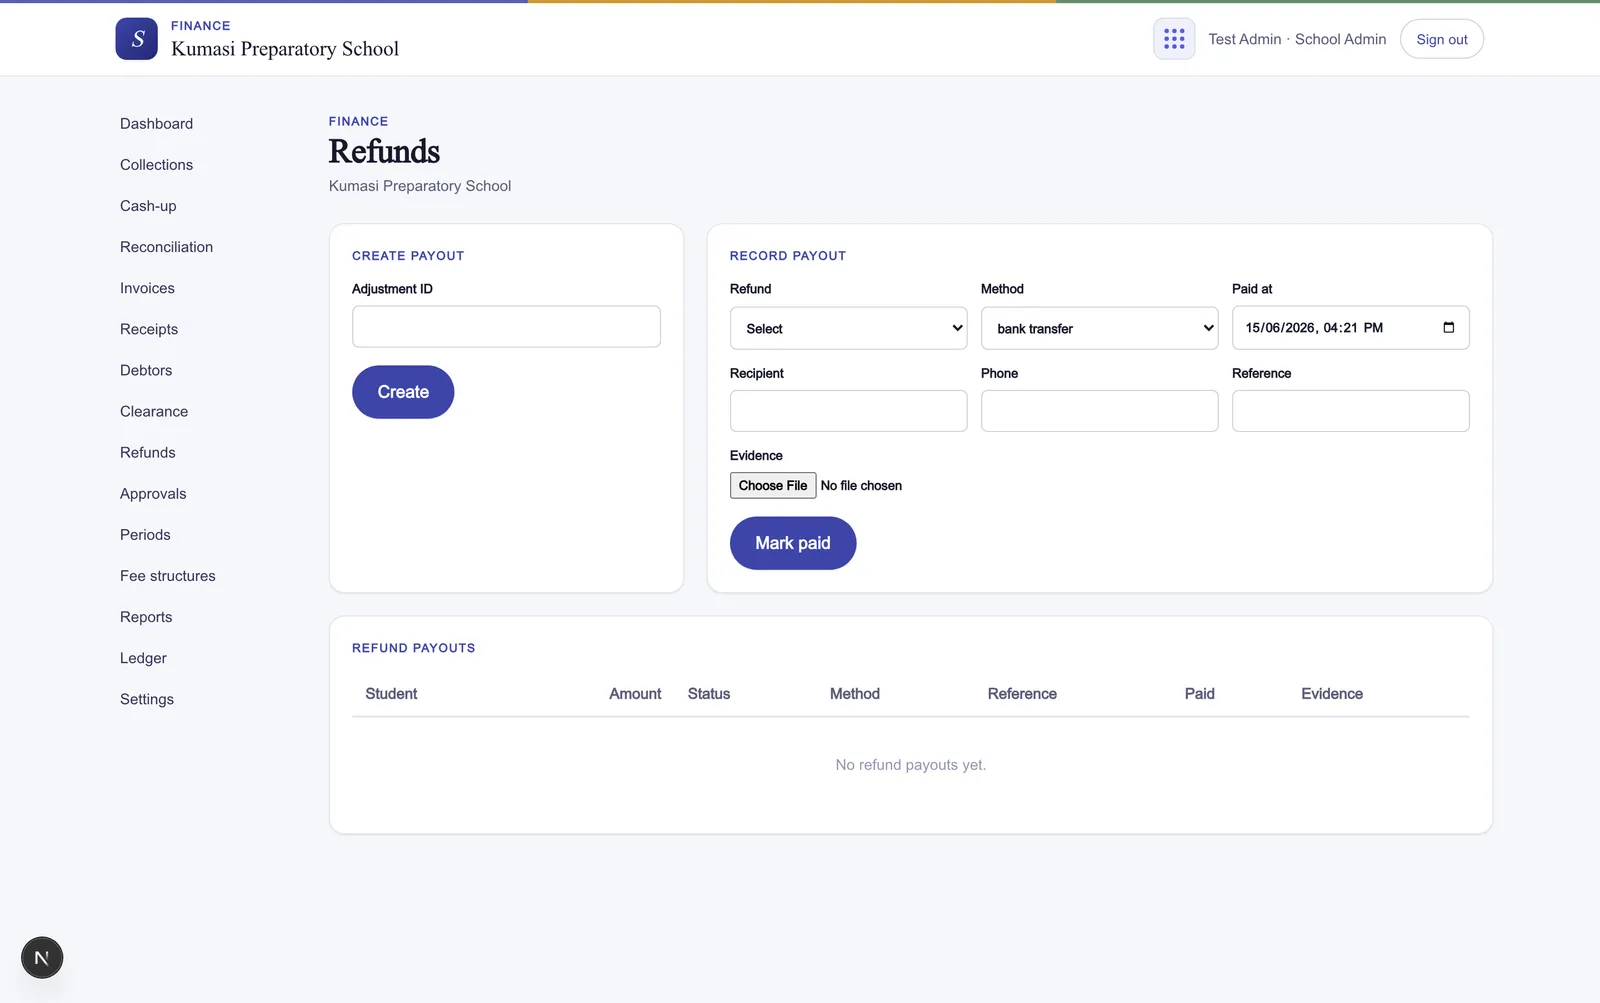
A refund is money leaving the school, so it never starts at the drawer — it traces back to an approved refund adjustment on an invoice (see § 07). Once that's approved, the payout is recorded under Refunds.
Press Create against the approved refund to open a pending payout.
When the money actually goes out, press Mark paid and record the method, the recipient, a reference, and any evidence (a transfer screenshot, a signed voucher).
Status
Meaning
pending
Payout created from an approved refund; not yet sent.
paid
Money sent and recorded with method, recipient, and evidence.
canceled
The payout was voided before it was sent.
disputed
The recipient or amount was challenged.
Fig.From an approved refund adjustment to a recorded payout — pending, then marked paid.
§ 16Finding & reprinting receipts
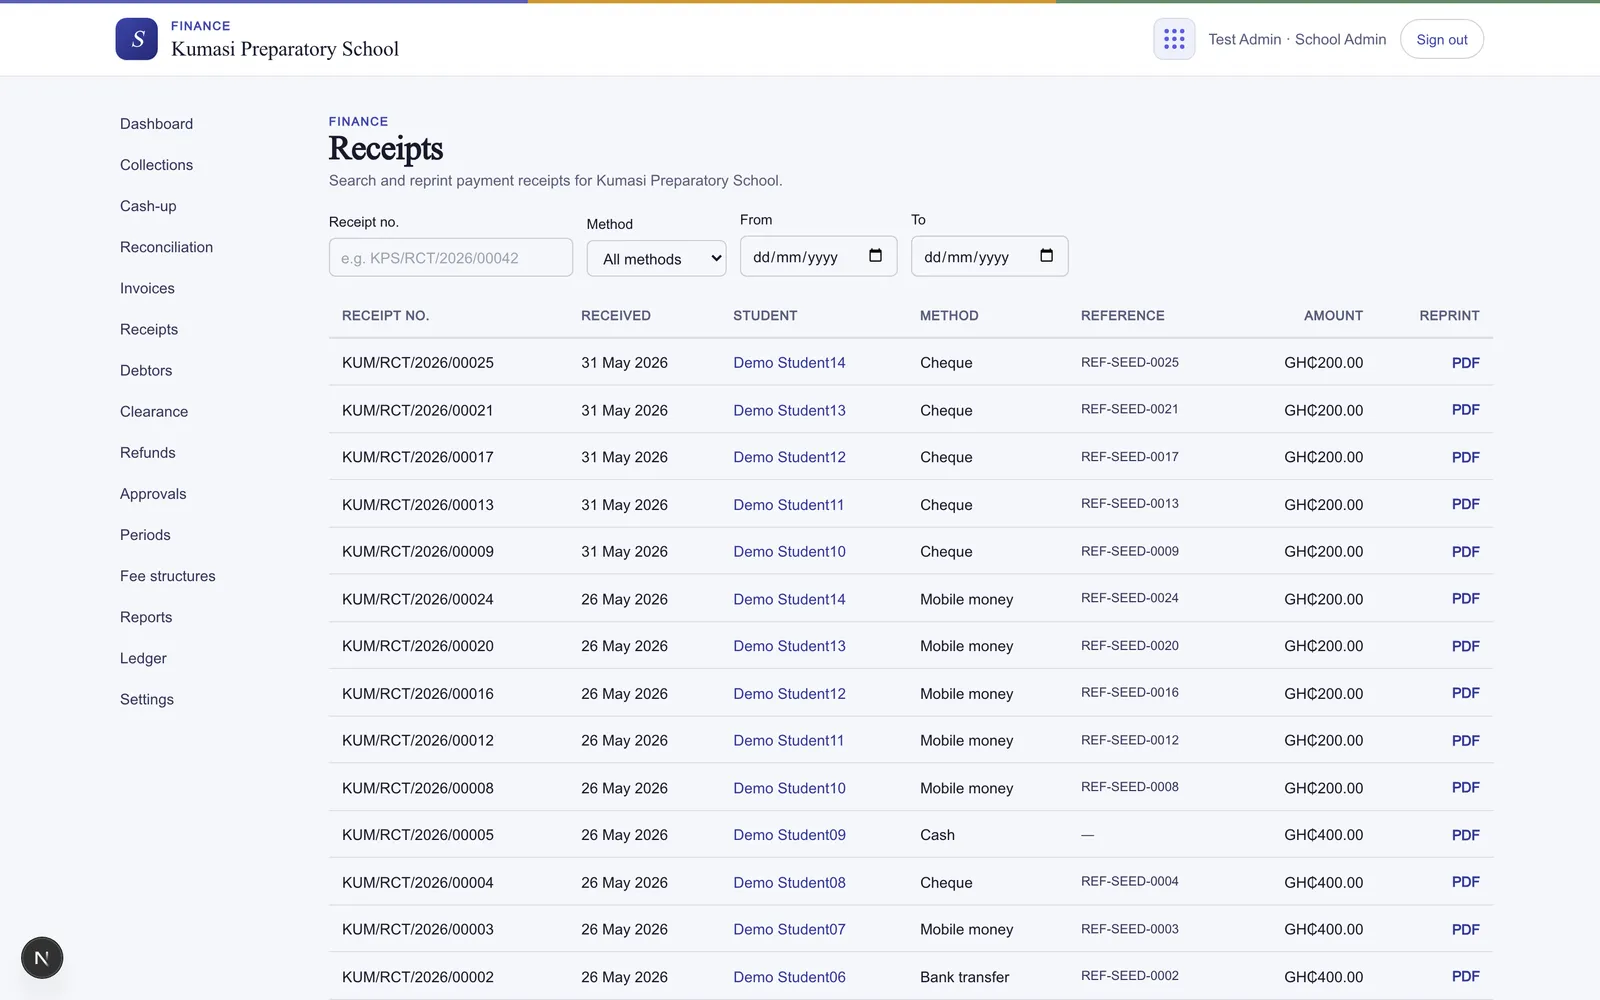
A parent has lost their receipt, or you need to look one up months later. Open Receipts.
Filter by Receipt no., by Method (Cash, Bank transfer, Mobile money, Cheque), and by a date range.
Press Reprint on any row to regenerate the same numbered PDF — nothing is re-recorded, so the books don't move.
A receipt tied to a voided or reversed payment carries a VOIDED badge, so a reprint can never be passed off as a live one.
Fig.Search by number, method, or date; reprint the PDF; voided receipts are badged.
§ 17A student's fee account
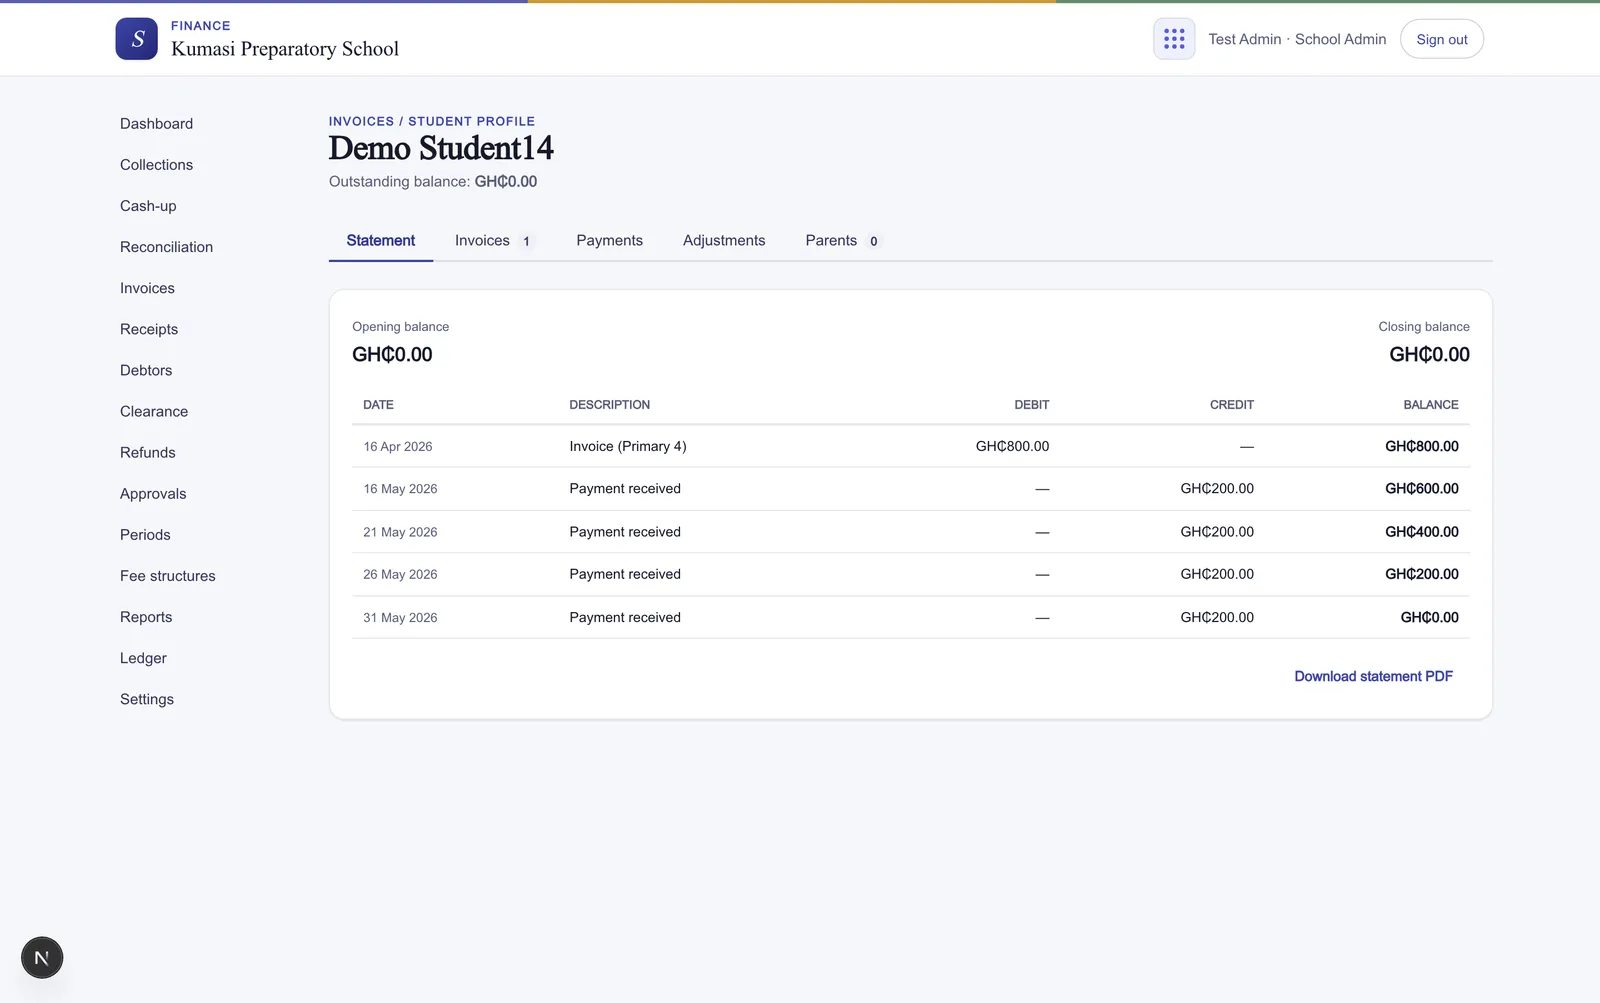
Every student has a single profile that pulls their whole fee history into one place — handy when a parent asks "what exactly do I owe, and why?". It's organised into tabs:
Statement — the Opening balance, every transaction in date order, and the Closing balance, with a Download statement PDF to hand the parent.
Invoices — every invoice raised for the student, across terms.
Payments — each receipt, with its method and reference.
Adjustments — discounts, scholarships, waivers, refunds, and reversals applied to the account.
Parents — the guardians linked to the student, who see all of this in their Parent Portal.
Fig.One profile, every tab — statement, invoices, payments, adjustments, and linked parents.