School Admin is your school's control room: people, classes, login cards, app access, term settings, SMS, and the audit trail. This guide walks through everything — including the exact order to set up a brand-new school so every other app works on day one.
school-admin.simusim.comSign in: email + password~25 min read
Go to your school's sign-in page (see Getting started), open the Admin door, and sign in with your email and password. You'll land on the Dashboard.
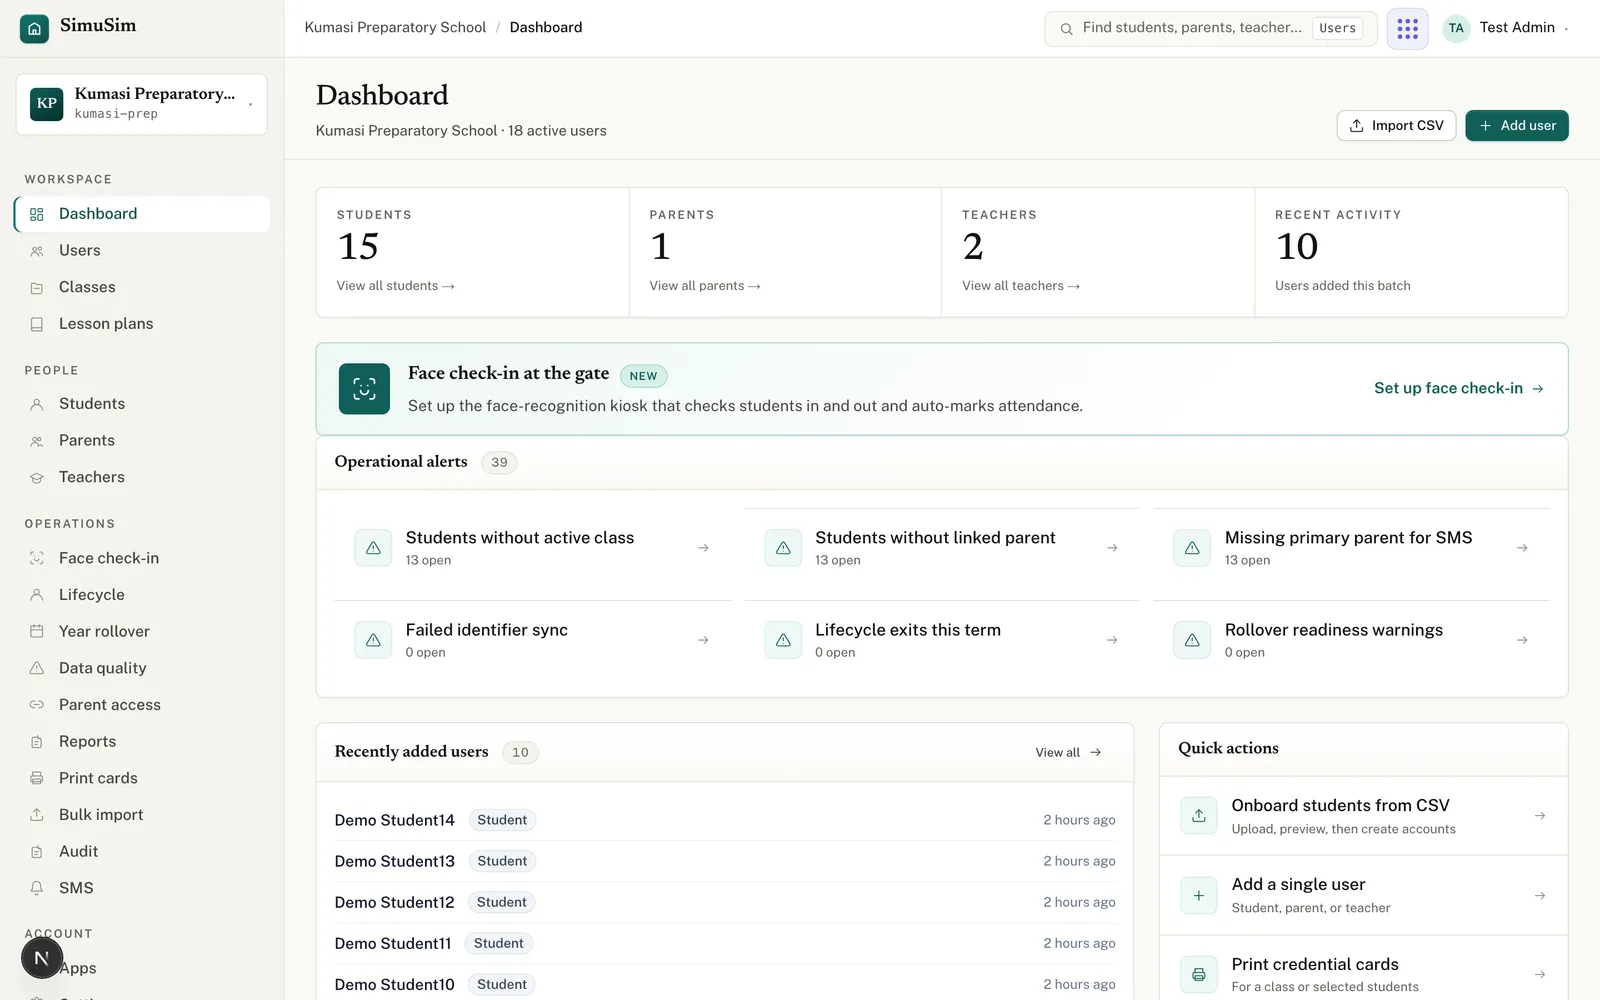
The sidebar is your map:
Workspace — Dashboard, Users, Classes, and Lesson plans (if your school has the Lesson Plans app).
People — quick filtered views: Students, Parents, Teachers.
Operations — Face check-in, Print cards, Bulk import, Audit, and SMS (if enabled).
Account — Apps (per-role app access) and Settings.
The dashboard itself shows live counts of students, parents, and teachers, a “Recently added users” list, and quick actions — Import CSV, Add user, Print credential cards, and a link across to Finance.
Fig.The dashboard. The left sidebar groups every screen into Workspace, People, Operations and Account.
§ 02First-time setup checklist
Do these in order when your school is new. Several features quietly depend on the earlier steps — for example, you can't create classes until the academic year is set, and report cards can't publish without a term calendar.
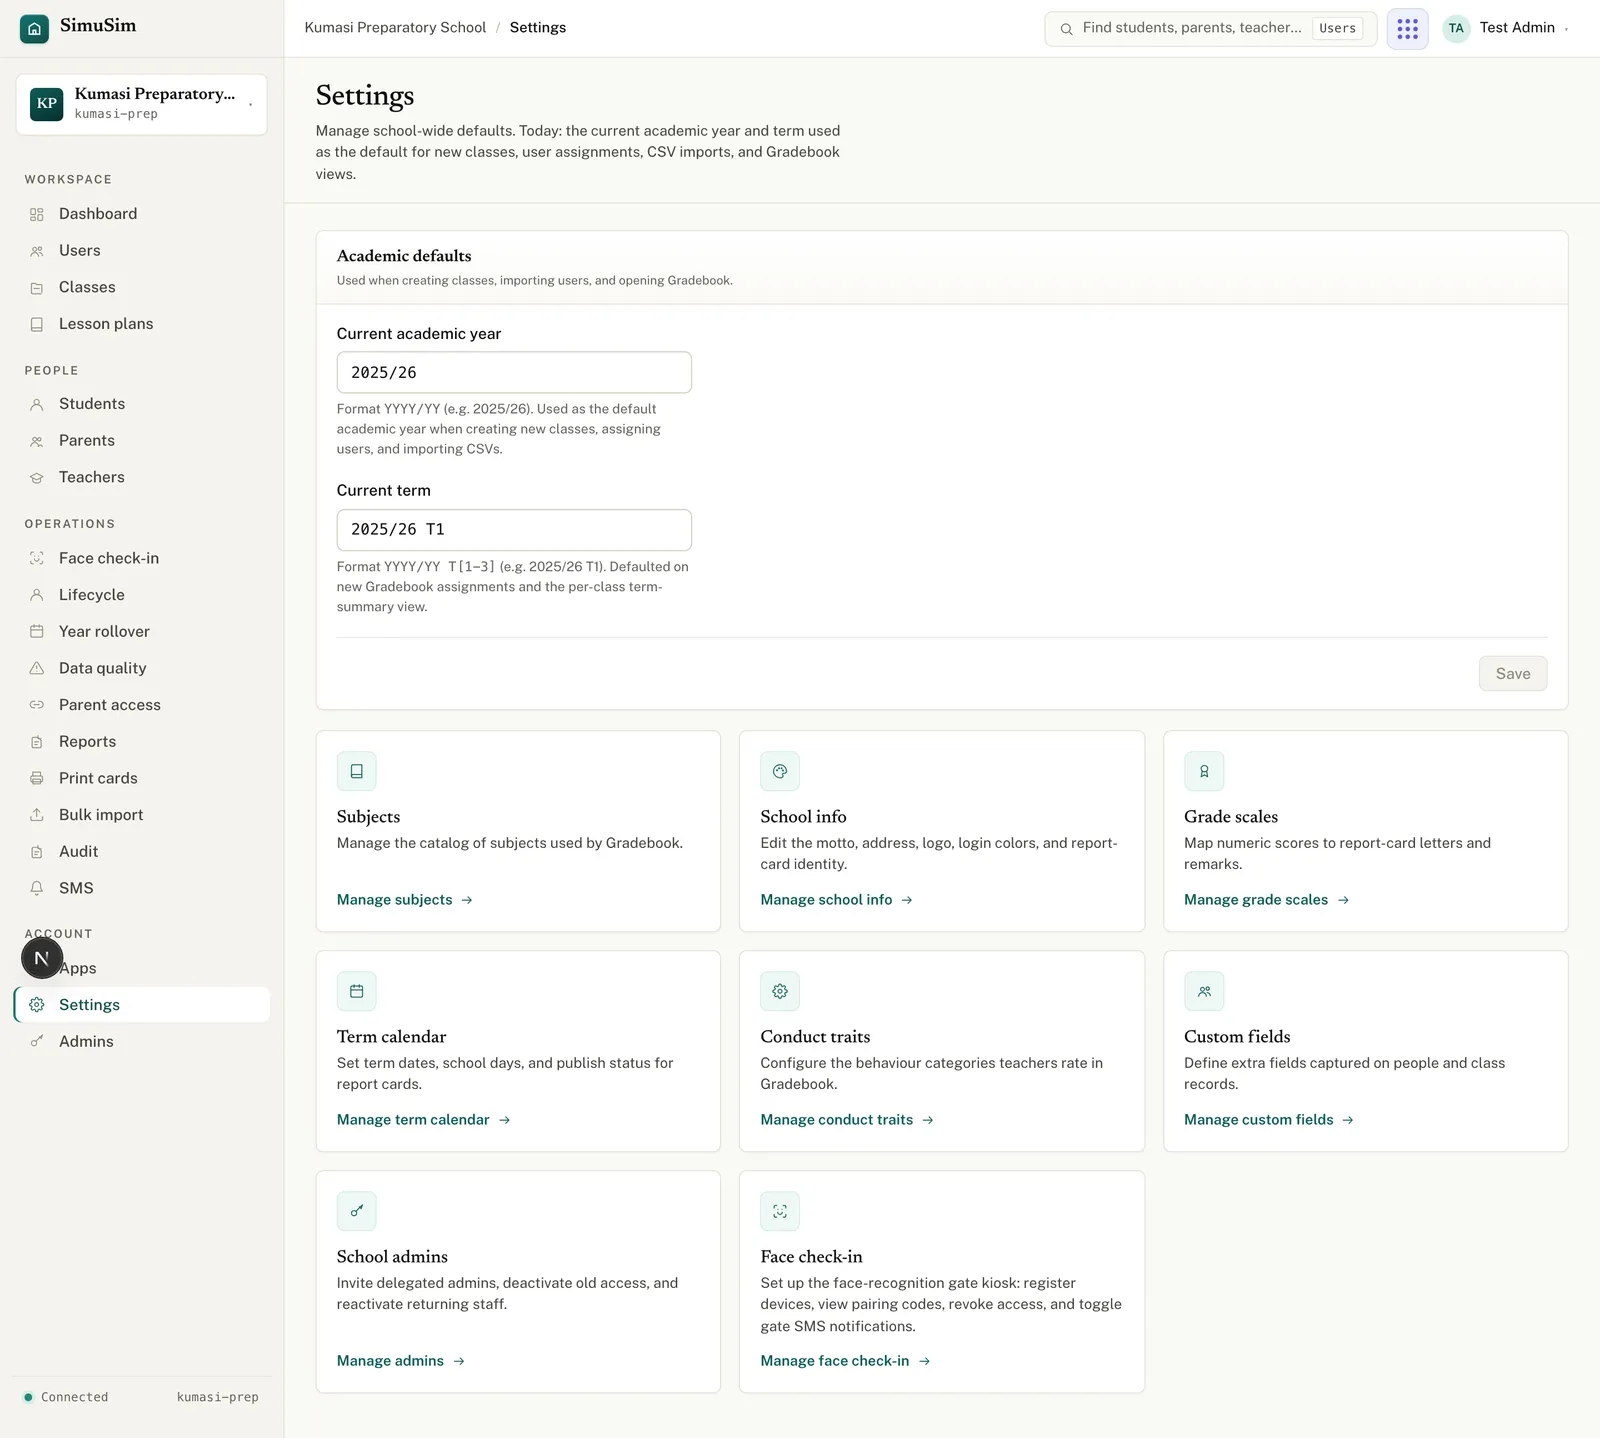
Set the academic year and term. Go to Settings, enter the Current academic year in the form 2025/26, type the Current term into its free-text field in the form 2025/26 T1 (format YYYY/YY T[1-3]), and press Save. This becomes the default everywhere — new classes, CSV imports, the Gradebook.
Build the term calendar.Settings → Term calendar: add each term with its name (e.g. “Term 1”), start date, end date, and number of school days. Required before any term's report cards can publish, and used for attendance rates.
Add your subjects.Settings → Subjects: create every subject you teach (Mathematics, English, Integrated Science…). The Gradebook and lesson plans are organised around these.
Create a grade scale.Settings → Grade scales: define how scores map to letters and remarks (e.g. 80–100 → A → “Excellent”). Used on report cards.
Check conduct traits.Settings → Conduct traits: the behaviour categories teachers rate at term wrap-up (e.g. Punctuality).
Add teachers, then students, then link parents. One by one (§ 03) or in bulk from CSV (§ 04 — the CSV can create classes and link parents in the same pass).
Check app access.Apps: confirm which apps each role can use (§ 09). A student who can't see Simu, or a teacher who can't open Gradebook, is almost always an app-access setting.
Print login cards for everyone (§ 07) and hand them out.
Rule of thumb
If something elsewhere says “Set the school's current academic year in Settings first” or a list is unexpectedly empty, come back to this checklist — a prerequisite step is missing.
§ 03Creating users one by one
Open Users in the sidebar, then press Add user (top right).
Choose the Role: Student, Parent, Teacher, or Non-teaching staff.
Enter the Given name and Family name.
Fill the role's extra fields:
Student — optionally a Code (format ABC-XYZ234: three capital letters, a dash, six characters — look-alike characters such as 0/O, 1/I and 5/S are never used; leave blank and Simusim generates one) and a Class. The class picker also offers Create new class… inline.
Parent / non-teaching staff — a Phone number. Local format is fine; it's stored in international form, so 0241234567 and +233241234567 are recognised as the same person.
Teacher — a Phone number, plus optionally Homeroom of a class. Each class can have only one homeroom teacher — you'll see an error if it's taken.
Press Create user.
The credentials screen appears once. It shows the new Identifier (student code or phone) and the PIN. From here, press Print card to print immediately, Add another user to keep going, or Done — back to users.
PINs show once
PINs are never stored in a readable form. After about 15 minutes, a reprinted card shows •••• instead of the PIN. Print the card (or note the PIN) right away — or simply reset the PIN later to issue a fresh one (§ 08).
Already-taken phone numbers or student codes are rejected with a clear message — two people can't share an identifier within a school.
§ 04Bulk import from CSV
Import up to 500 students per upload (file limit 2 MB), creating classes and linking parents in the same pass. Open Bulk import from the sidebar (or Import CSV on the dashboard).
The file
One student per row. Columns:
Column
Required
Notes
given_name
Yes
First name, 1–100 characters.
family_name
Yes
Last name, 1–100 characters.
parent_phone
No
Local or international format. Creates (or finds) the parent and links them to the student. Requires parent_name.
parent_name
No
The parent's full name; required whenever parent_phone is given.
code
No
Student code in ABC-XYZ234 form (look-alike characters such as 0/O, 1/I and 5/S are never used). Leave blank to auto-generate.
class_label
No
e.g. P.6A. Simusim reuses the class if it exists in the chosen academic year, or creates it.
Upload. Optionally set Import for academic year (YYYY/YY; blank = the school's current year), pick your CSV file, and continue. Files with missing required columns, more than 500 rows, or over 2 MB are rejected here with a message saying exactly why.
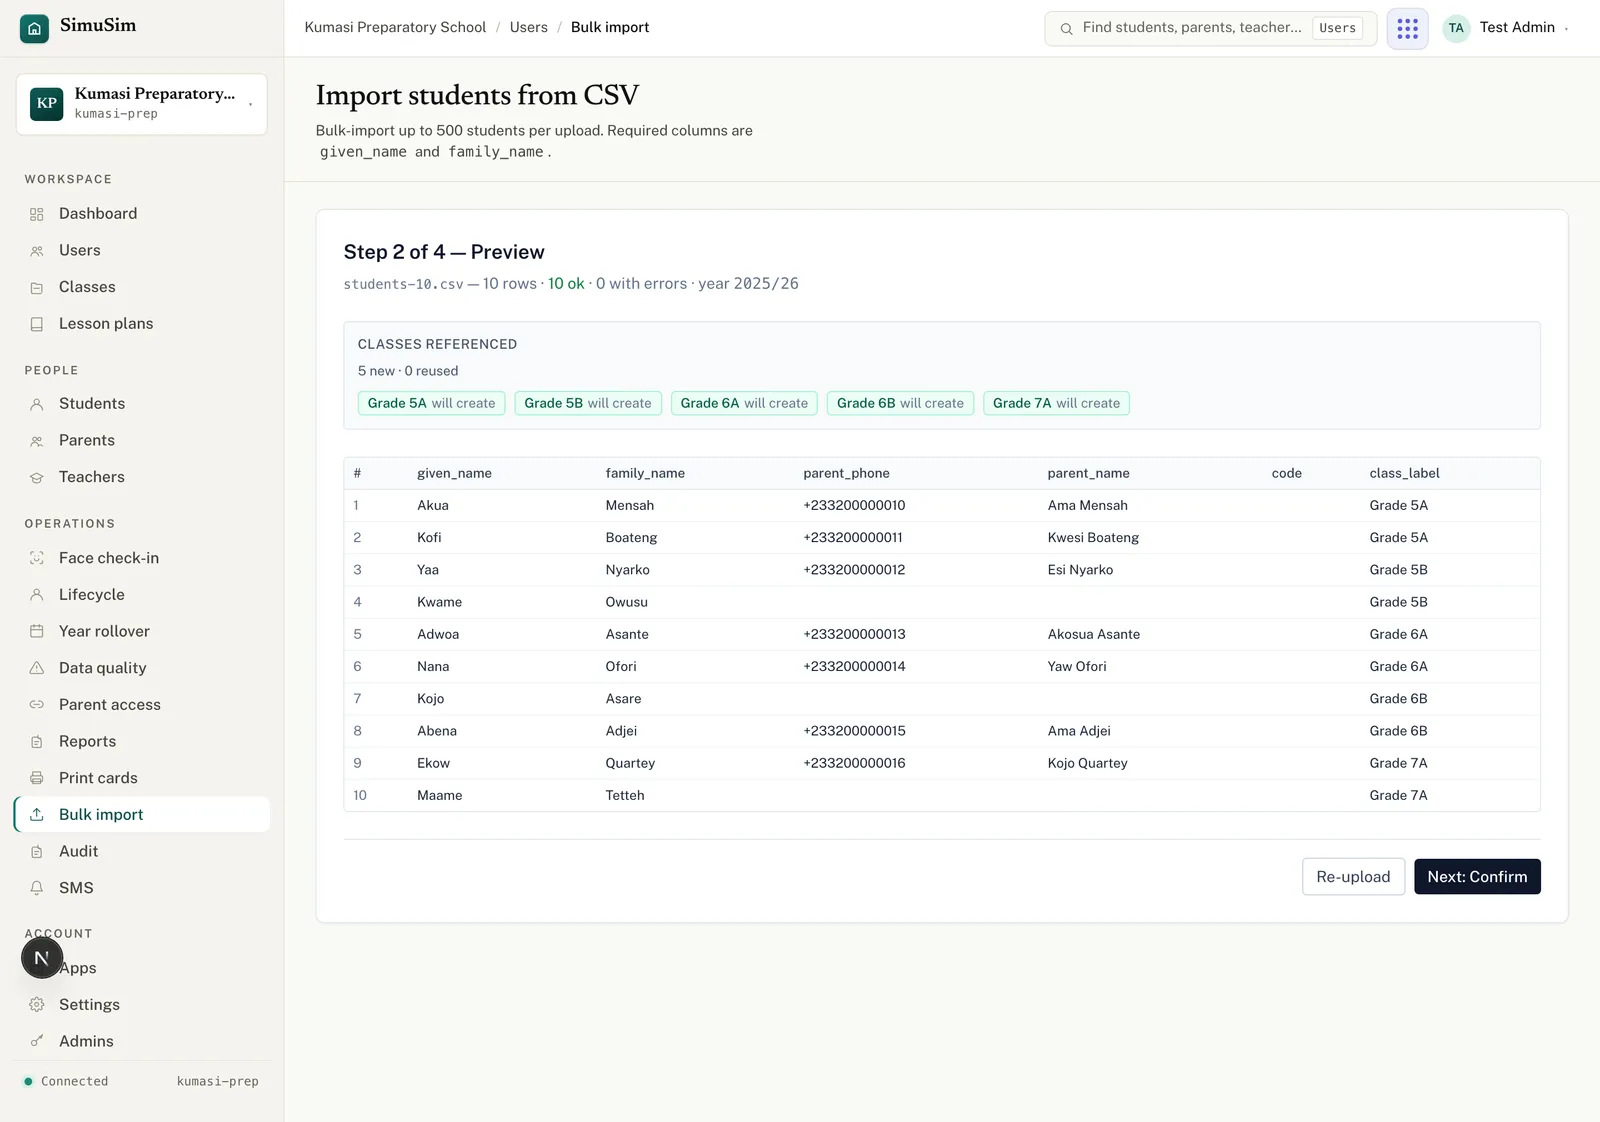
Preview. Every row is shown with a ✓ or an error (e.g. an invalid phone). You'll also see whether each class_labelwill be reused or will be created. Fix the file and Re-upload if needed, or press Next.
Confirm. A summary — how many students, classes, and parent links will be created. Press Import.
Result. Counts of everything created. Finish with Done — view users — then go print their login cards.
Fig.Step 2 — Preview. Every row is validated, and you see which classes will be reused vs created before pressing Next: Confirm.
Note
Imports can't be undone in bulk. If something was wrong, you can deactivate the affected students afterwards (§ 08) and re-import.
§ 05Managing a user
Open Users, find the person (search box: “Name or identifier”, role chips: All / Students / Parents / Teachers / Non-teaching staff), and click their row. The detail page gathers everything about them:
Profile — edit the given/family name and any custom fields your school has defined; press Save changes.
App access — tick exactly which apps this person can open, then Save apps. Only apps relevant to their role (and enabled for the school) appear.
Linked parents (on a student) — press Add parent, search for the parent, and link them. The parent immediately sees this child in the Parent Portal. Unlink removes the relationship.
Linked students (on a parent) — a read-only list of the children this parent is linked to; each row has an Open link to the student. To add or remove a link, do it from the student's detail page.
Face enrolment (on a student) — status for the gate kiosk, with consent and enrolment dates (see the kiosk guide).
Cumulative transcript (on a student) — press Download transcript for a cross-term academic record PDF that spans every published term. A student with no published terms still produces a valid (mostly empty) PDF.
SMS settings — choose the student's primary parent for SMS, or set a parent's announcement opt-out.
§ 06Classes & rosters
Create a class
Open Classes, press New class.
Enter the Label (placeholder JHS 1A; e.g. P.6A, B7 Blue), pick the required Level (the form can't be submitted without it), and set the Academic year (2025/26 — pre-filled from Settings).
Optionally pick a Homeroom teacher. One homeroom teacher per class; the homeroom teacher is who sees the class in Attendance.
Press Create class.
Work the roster
On a class's page you can:
Enroll students — pick from students not yet in the class.
Withdraw a student, or Transfer them to another class in the same year.
Change the label or homeroom teacher with Edit; Archive a class you no longer use (archived classes can be shown again with the “Show archived” filter and unarchived).
Subject teachers — under Add subject teacher, choose the subject and teacher and press Add to assign which teacher teaches which subject in this class. This drives the Gradebook and Lesson Plans: a teacher only sees the subjects they're assigned.
§ 07Printing login cards
Open Print cards in the sidebar.
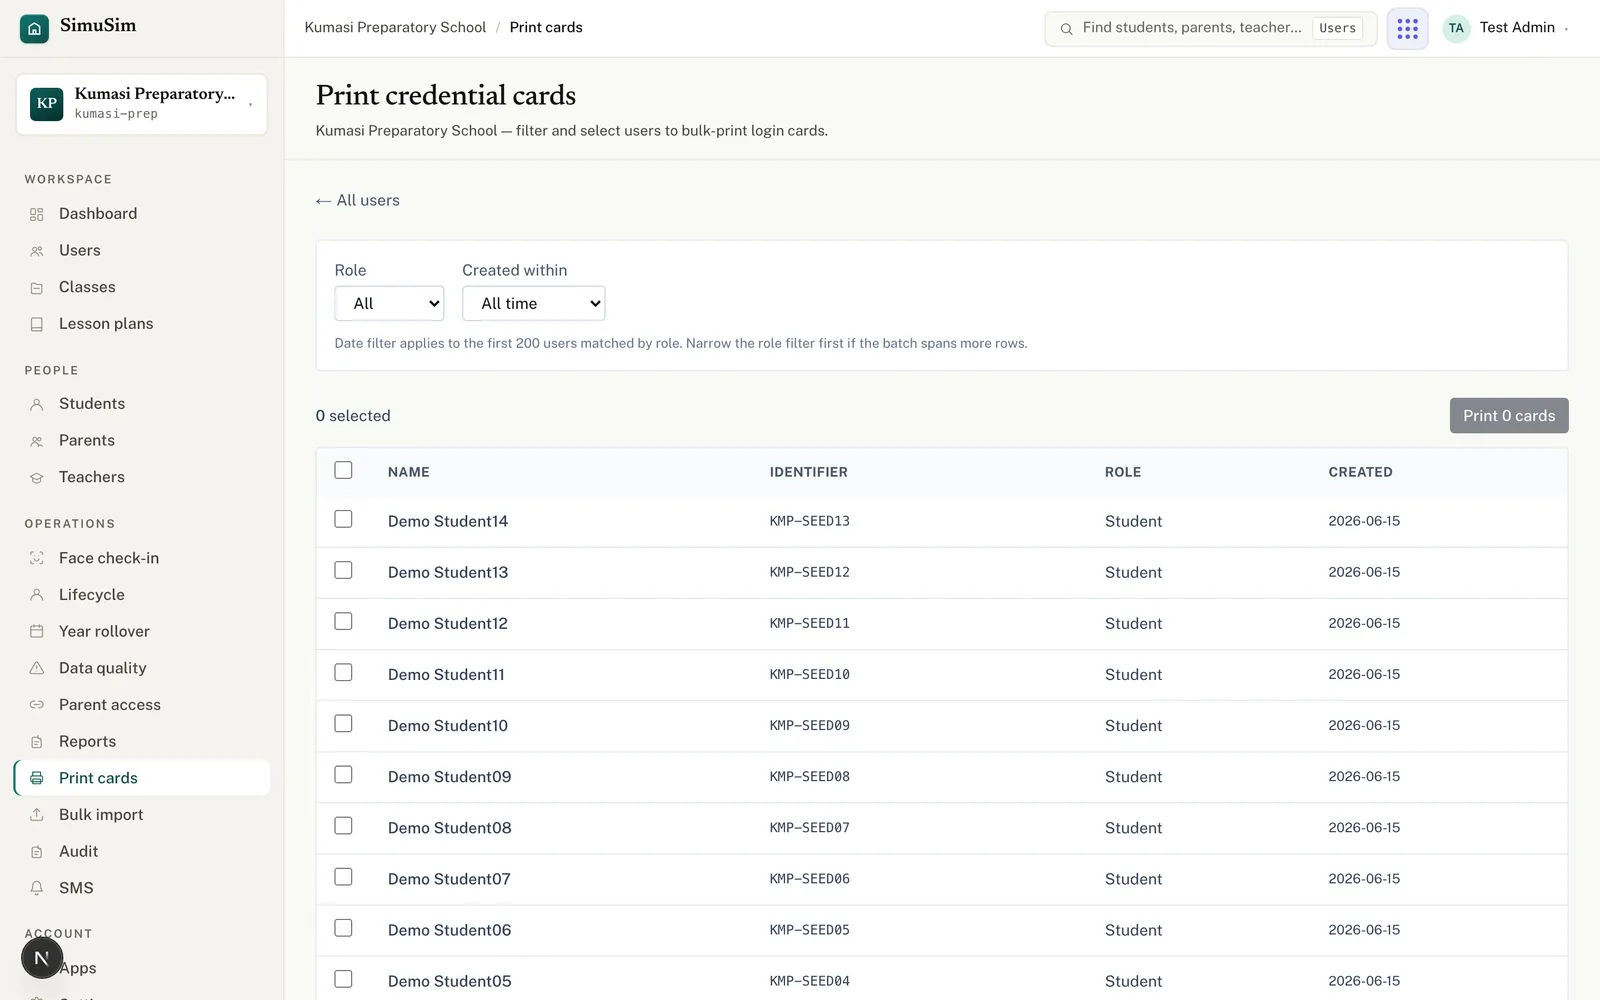
Filter who you want: role (All / Students / Parents / Teachers) and created-within (All time / Last 7 days / Last 30 days). “Last 7 days” is perfect right after an import.
Tick the people to print (or Select all), then press Print cards.
A PDF downloads — 8 wallet-sized cards per A4 sheet with dashed cut lines. Print it, cut, and hand out.
Fig.Filter, select, and print. “Last 7 days” is ideal right after an import.
Blank PINs?
Cards show the PIN only within ~15 minutes of the account being created or the PIN being reset; after that they print ••••. For older accounts: reset the PIN first, then print — the card comes out complete.
§ 08PIN resets, deactivation & reactivation
Reset a PIN
Find the person in Users and press Reset PIN on their row.
Confirm — the previous PIN stops working immediately.
The new PIN is shown once. Print a fresh card or pass the PIN on securely.
Deactivate / reactivate
Press Deactivate on a user's row to remove their access immediately (when someone leaves the school, or after a bad import). Nothing is deleted — their history stays. To bring someone back: tick Show deactivated in the Users filter, find them, and press Reactivate.
§ 09App access — who can open what
Two layers control this:
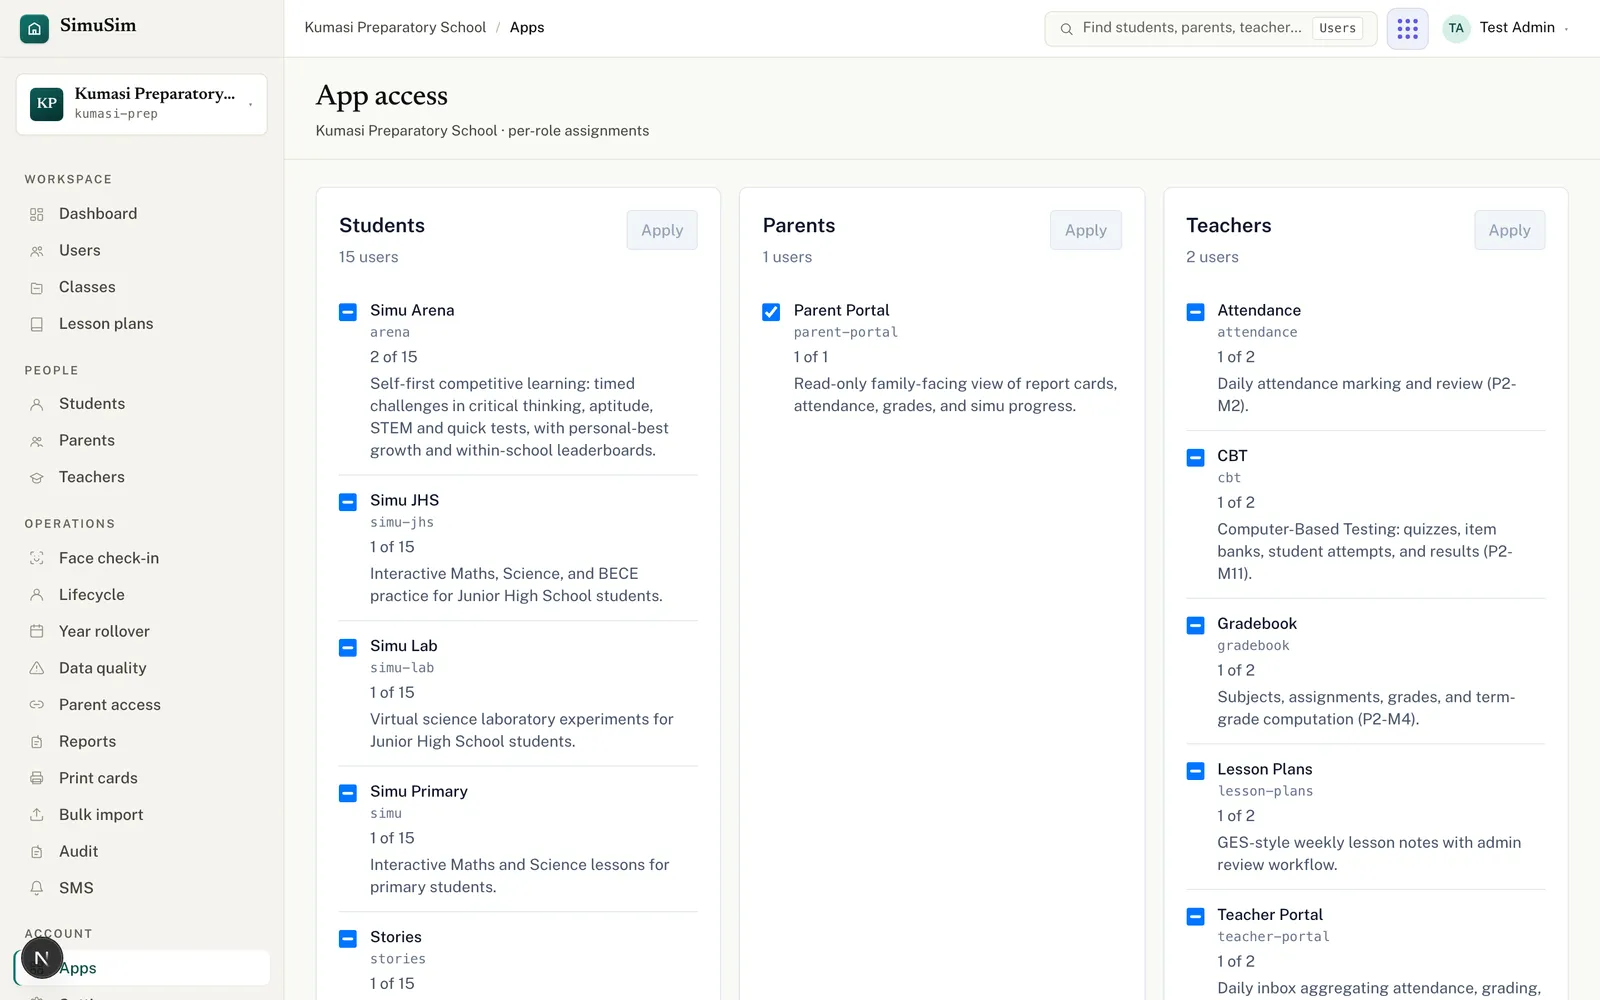
Per role.Apps in the sidebar shows three columns — Student, Parent, Teacher — each with checkboxes for the apps that role may use. Tick or untick, then Save apps. (Apps your school's subscription doesn't include appear greyed out.)
Per person. On any user's detail page, the App access panel narrows it further for that individual. New users typically need their apps ticked here before the app appears in their portal.
Fig.Per-role app access. Apps your subscription doesn’t include appear greyed out.
Most common support question
“Why can't my student open Simu?” — check, in order: ① the school has the app (subscription), ② the role allows it (Apps), ③ the individual has it ticked (user detail → App access).
§ 10Settings
Settings holds the school-wide defaults — the current academic year and term at the top, then cards into each area:
Fig.The Settings hub. The year and term sit at the very top; each card opens one area.
Curricula — a school can follow more than one curriculum (e.g. Ghana NaCCA and Cambridge International) as parallel streams; subjects, grade scales, and classes are organised per curriculum. See the curriculum guide for the full setup.
Subjects — the subject catalogue used by Gradebook and Lesson Plans, grouped by curriculum. Renames apply everywhere, including history; a subject can't be deleted while classes still use it.
School info — name, motto, address, logo, and login-page colours; also your report-card identity.
Grade scales — map score ranges to letters and remarks. Press Add scale, name it, add rows (min score, max score, letter, remark), then Add scale to save.
Term calendar — each term's dates and school days, plus the term's publish action: publishing locks that term's grades and opens the parent-facing report-card PDFs. You can unpublish if something must be corrected.
Conduct traits — the behaviour categories teachers rate at term wrap-up.
Behaviour categories — the categories (with signed default points) used when logging behaviour incidents (see the behaviour guide).
Custom fields — extra fields on students, parents, teachers, staff, or classes (types: short text, long text, number, date, yes/no, single-select, or multi-select).
School admins — invite delegated admins, deactivate old access, and reactivate returning staff.
Messaging settings — configure parent messaging and SMS nudge behaviour for the school inbox (see the communication guide).
§ 11SMS & announcements
If your school has SMS enabled, SMS in the sidebar shows three cards: Messaging, SMS Wallet, and Sender ID.
Send an announcement to parents
Press Send announcement.
Type the message. The counter shows your length out of 160 characters — and that includes the school-name prefix automatically added to every message (e.g. KUMASIPREP: ).
Choose the audience: All parents in the school or Parents of a specific class.
Check the live cost: each parent receives one SMS at ₵0.06 (6 pesewas). The exact recipient count is confirmed on the announcement's detail page after you send, not live in the composer.
Press Send announcement. Messages composed during quiet hours (21:00–07:00) are scheduled for 07:00 the next morning unless you tick Send now (override quiet hours).
The announcement page then tracks delivery per recipient. Dispatch history lists everything ever sent.
Wallet & sender ID
Wallet — every SMS draws from your school's wallet. Below GHS 5.00 you'll see a Low balance badge and a warning that outgoing SMS may fail; press Request top-up to email the Simusim team, then pay by your usual method.
Sender ID — request your school's own sender name (max 11 characters); fill the request form and press Submit request. The Simusim team registers it with the network regulator and approves it. Until then, messages go out from the shared “SimuSim” sender.
Parents who shouldn't receive announcements can be opted out on their user page; students with several linked parents have a primary parent for SMS you can choose.
Message templates
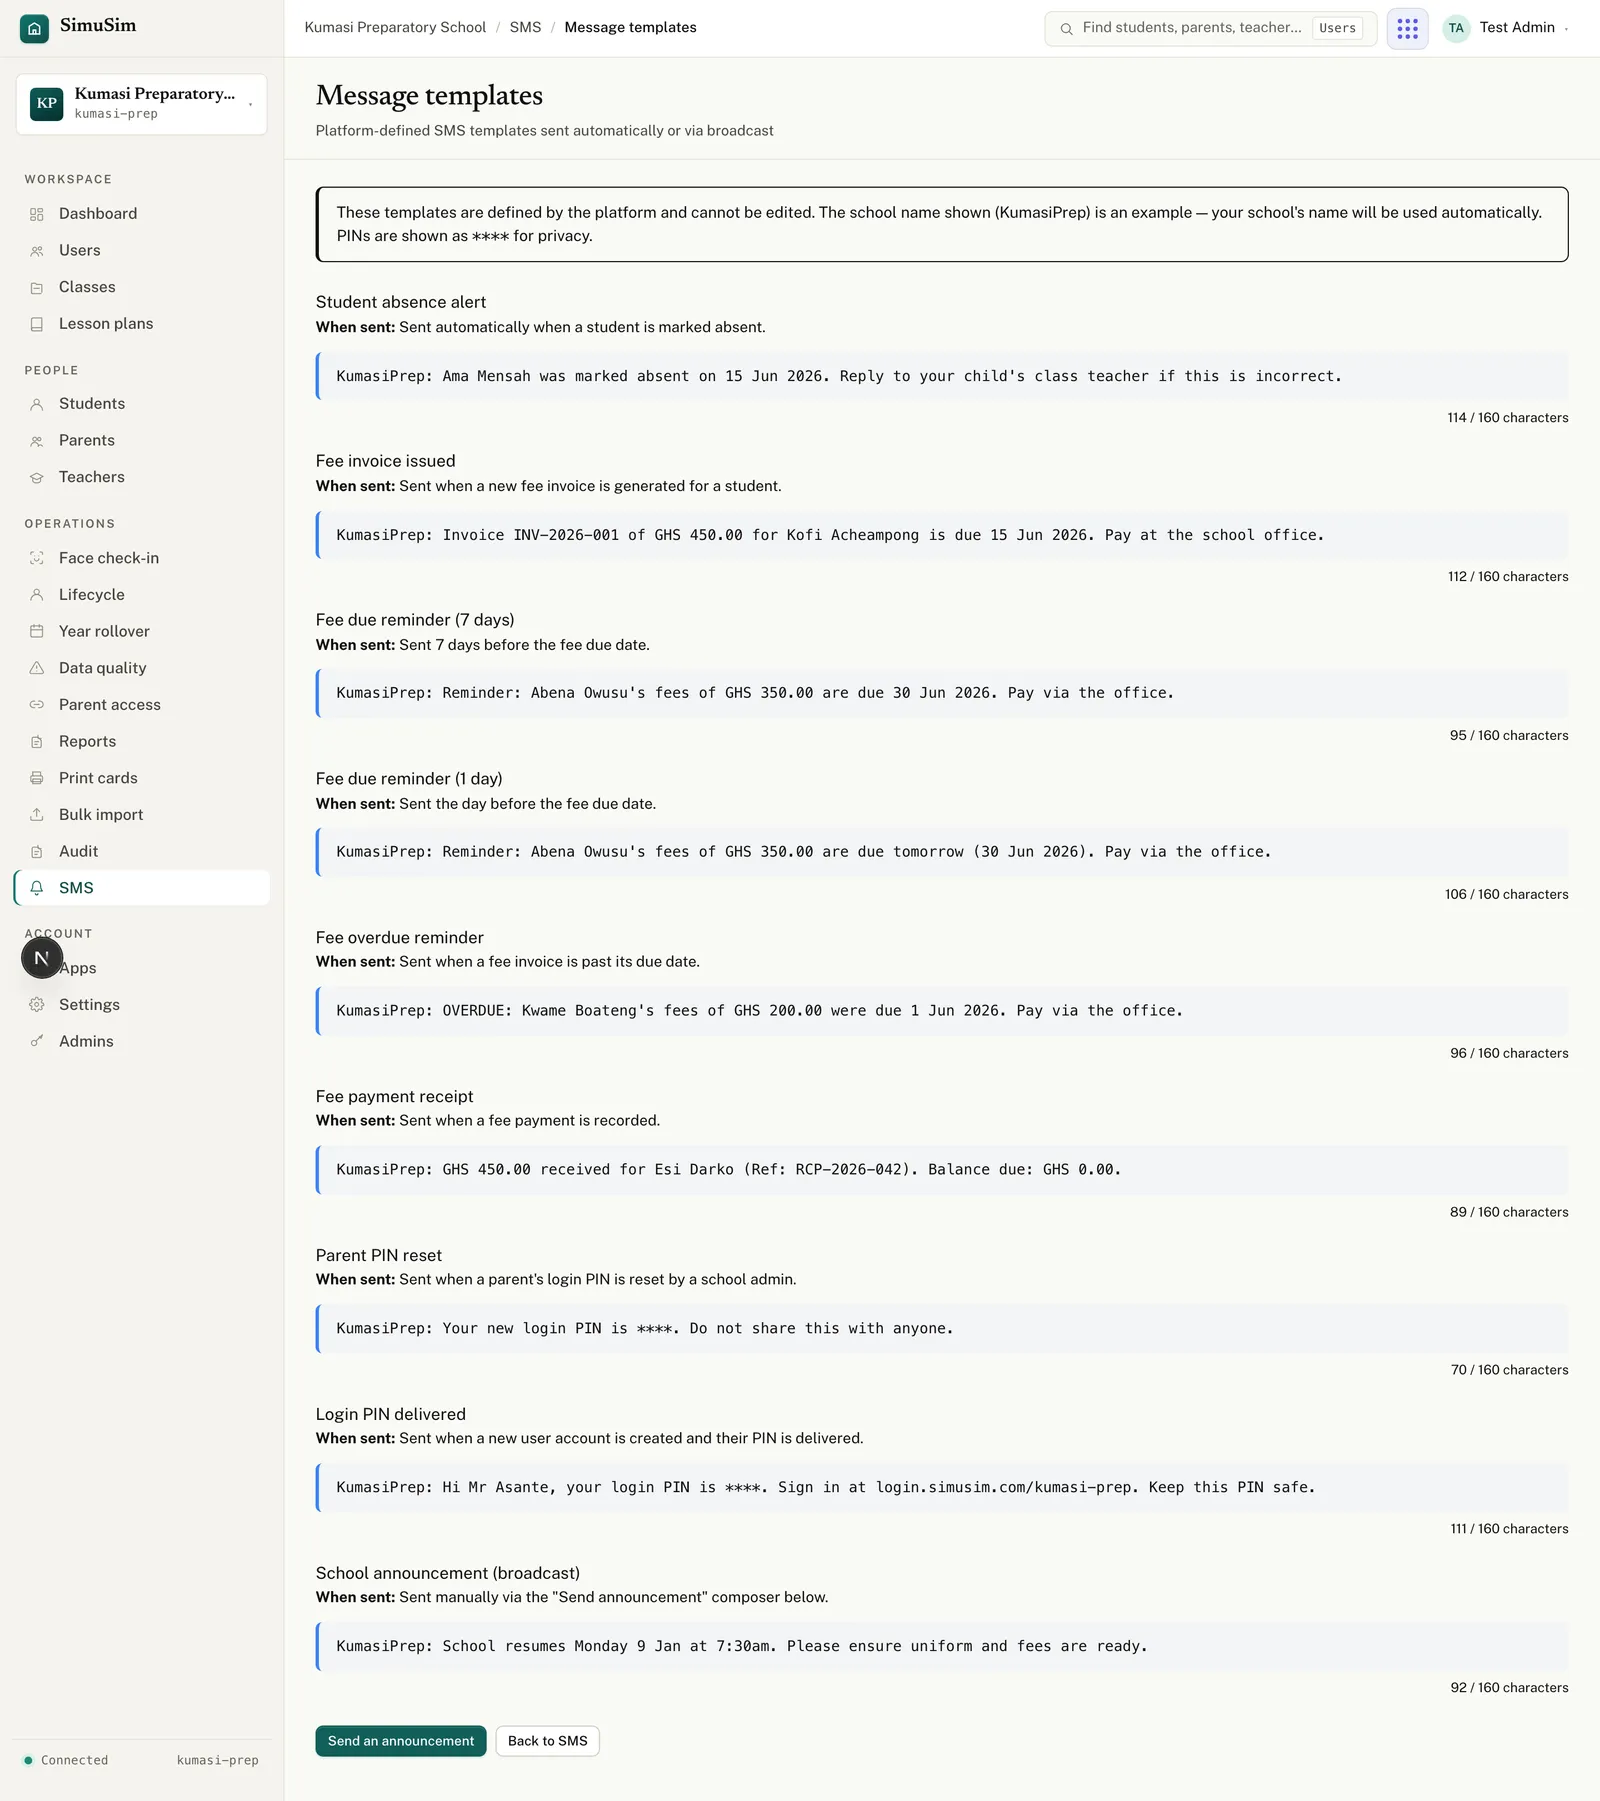
Open SMS → Templates to see the nine messages Simusim can send. They're platform-defined and can't be edited — your school's name is filled in automatically, and PINs always show as ****. Most fire on their own; the last is the one you compose.
Template
When it's sent
Student absence alert
A student is marked absent.
Fee invoice issued
A new fee invoice is generated for a student.
Fee due reminder (7 days)
7 days before the fee due date.
Fee due reminder (1 day)
The day before the fee due date.
Fee overdue reminder
A fee invoice is past its due date.
Fee payment receipt
A fee payment is recorded.
Parent PIN reset
A parent's login PIN is reset by an admin.
Login PIN delivered
A new account is created and its PIN delivered.
School announcement (broadcast)
You send it via the Send announcement composer.
Fig.The nine templates are read-only previews — the school name and values are examples; yours fill in automatically.
§ 12Lesson-plan reviews
When teachers submit weekly lesson notes (see the teacher guide), they arrive in Lesson plans — the review queue, filtered to Submitted by default. Filter by class, subject, teacher, week, or status. Open a note to read it, then either:
Approve — the teacher sees a green Approved badge, or
Request revision — opens a feedback box; add your comment and press Send revision request. The note returns to the teacher marked Needs revision with your comment attached.
§ 13Face check-in devices
Settings → Face check-in (also Face check-in in the sidebar) manages your gate tablets:
Under Register a device, enter a device name (e.g. “Main gate”) and an optional location, then press Register device. A one-time pairing code like ABCDE-FGHJK appears — it's valid for 10 minutes and shown once.
On the gate tablet, open kiosk.simusim.com, type the code, and press Pair device.
The device appears in your Registered devices list, where you can watch its last-seen time or Revoke it instantly if the tablet is lost. The device name is set once when you register it and can't be changed afterwards.
Toggle gate SMS notifications here if you want parents to receive an SMS when their child checks in or out.
Face enrolment, daily use, and troubleshooting are covered in the dedicated kiosk guide.
§ 14The audit log
Audit is the read-only history of everything done in your school — user created, PIN reset, class archived, term published, announcement sent — newest first. Filter by action, target type, or date range; click any row for the full before/after detail; press Export CSV to take it to a spreadsheet.
Use it whenever you need to answer “who changed this, and when?”
§ 15Co-admins
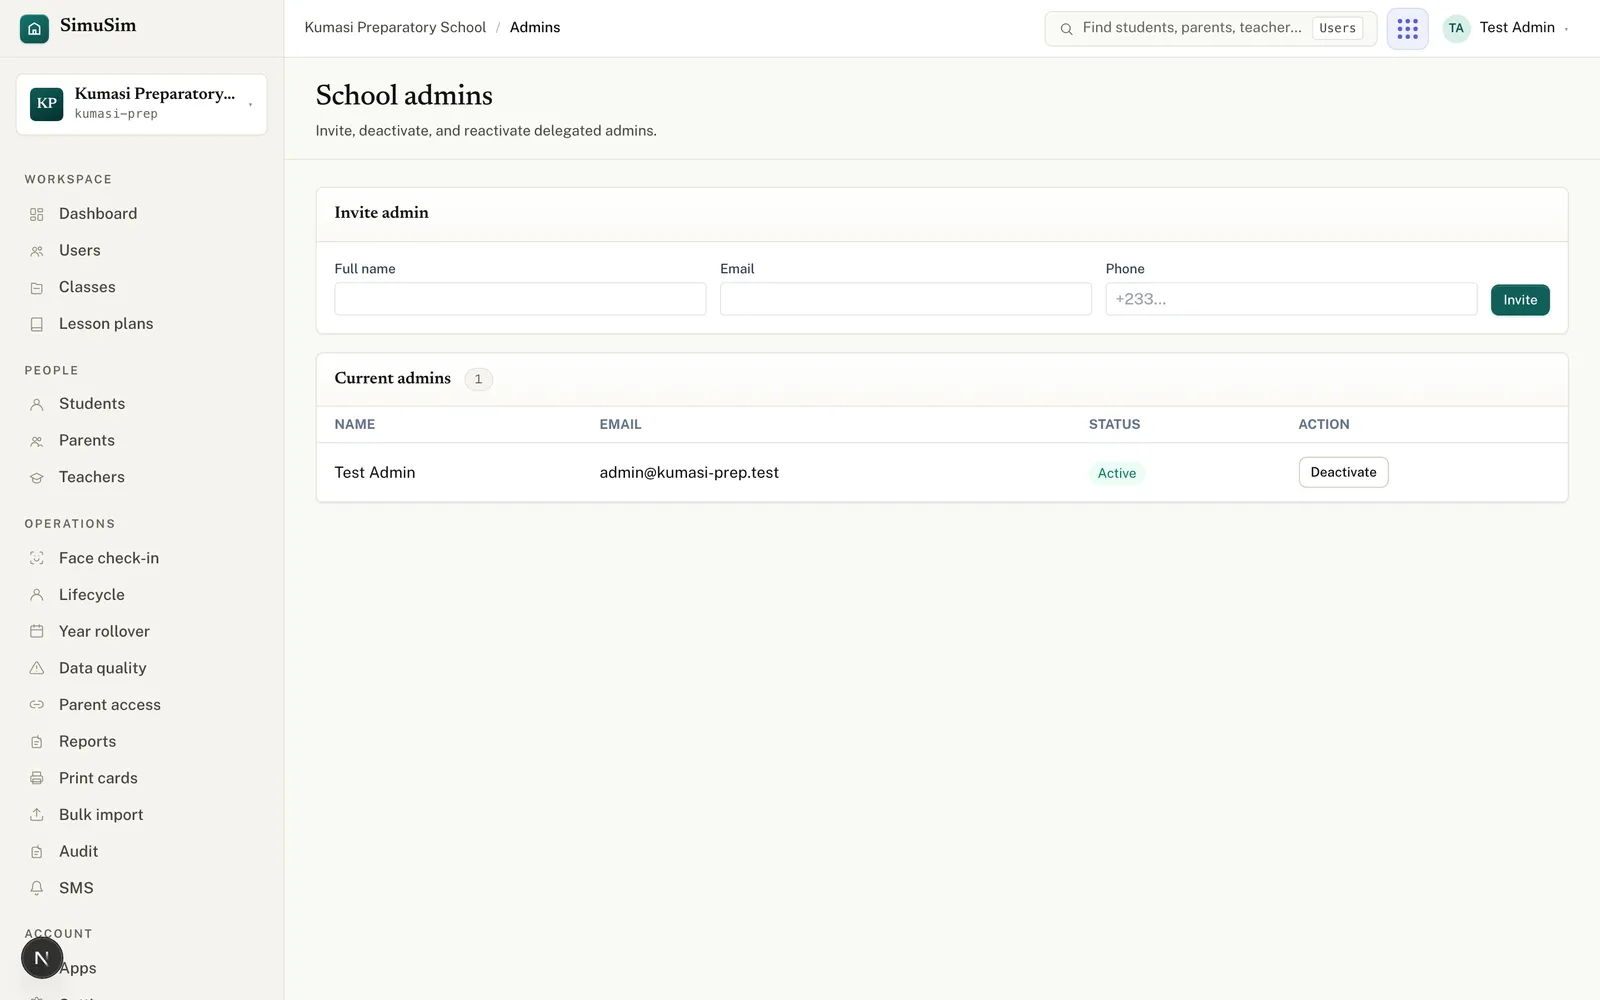
You don't have to run the school alone. Settings → Admins ("School admins") manages your fellow administrators. Fill Full name, Email and optionally Phone, then press Invite. Each admin appears in the Current admins table with an Active or Deactivated status; use Deactivate when someone leaves and Reactivate if they return.
Fig.Co-admins get the same powers you have — deactivate one the moment they leave.
§ 16Student lifecycle
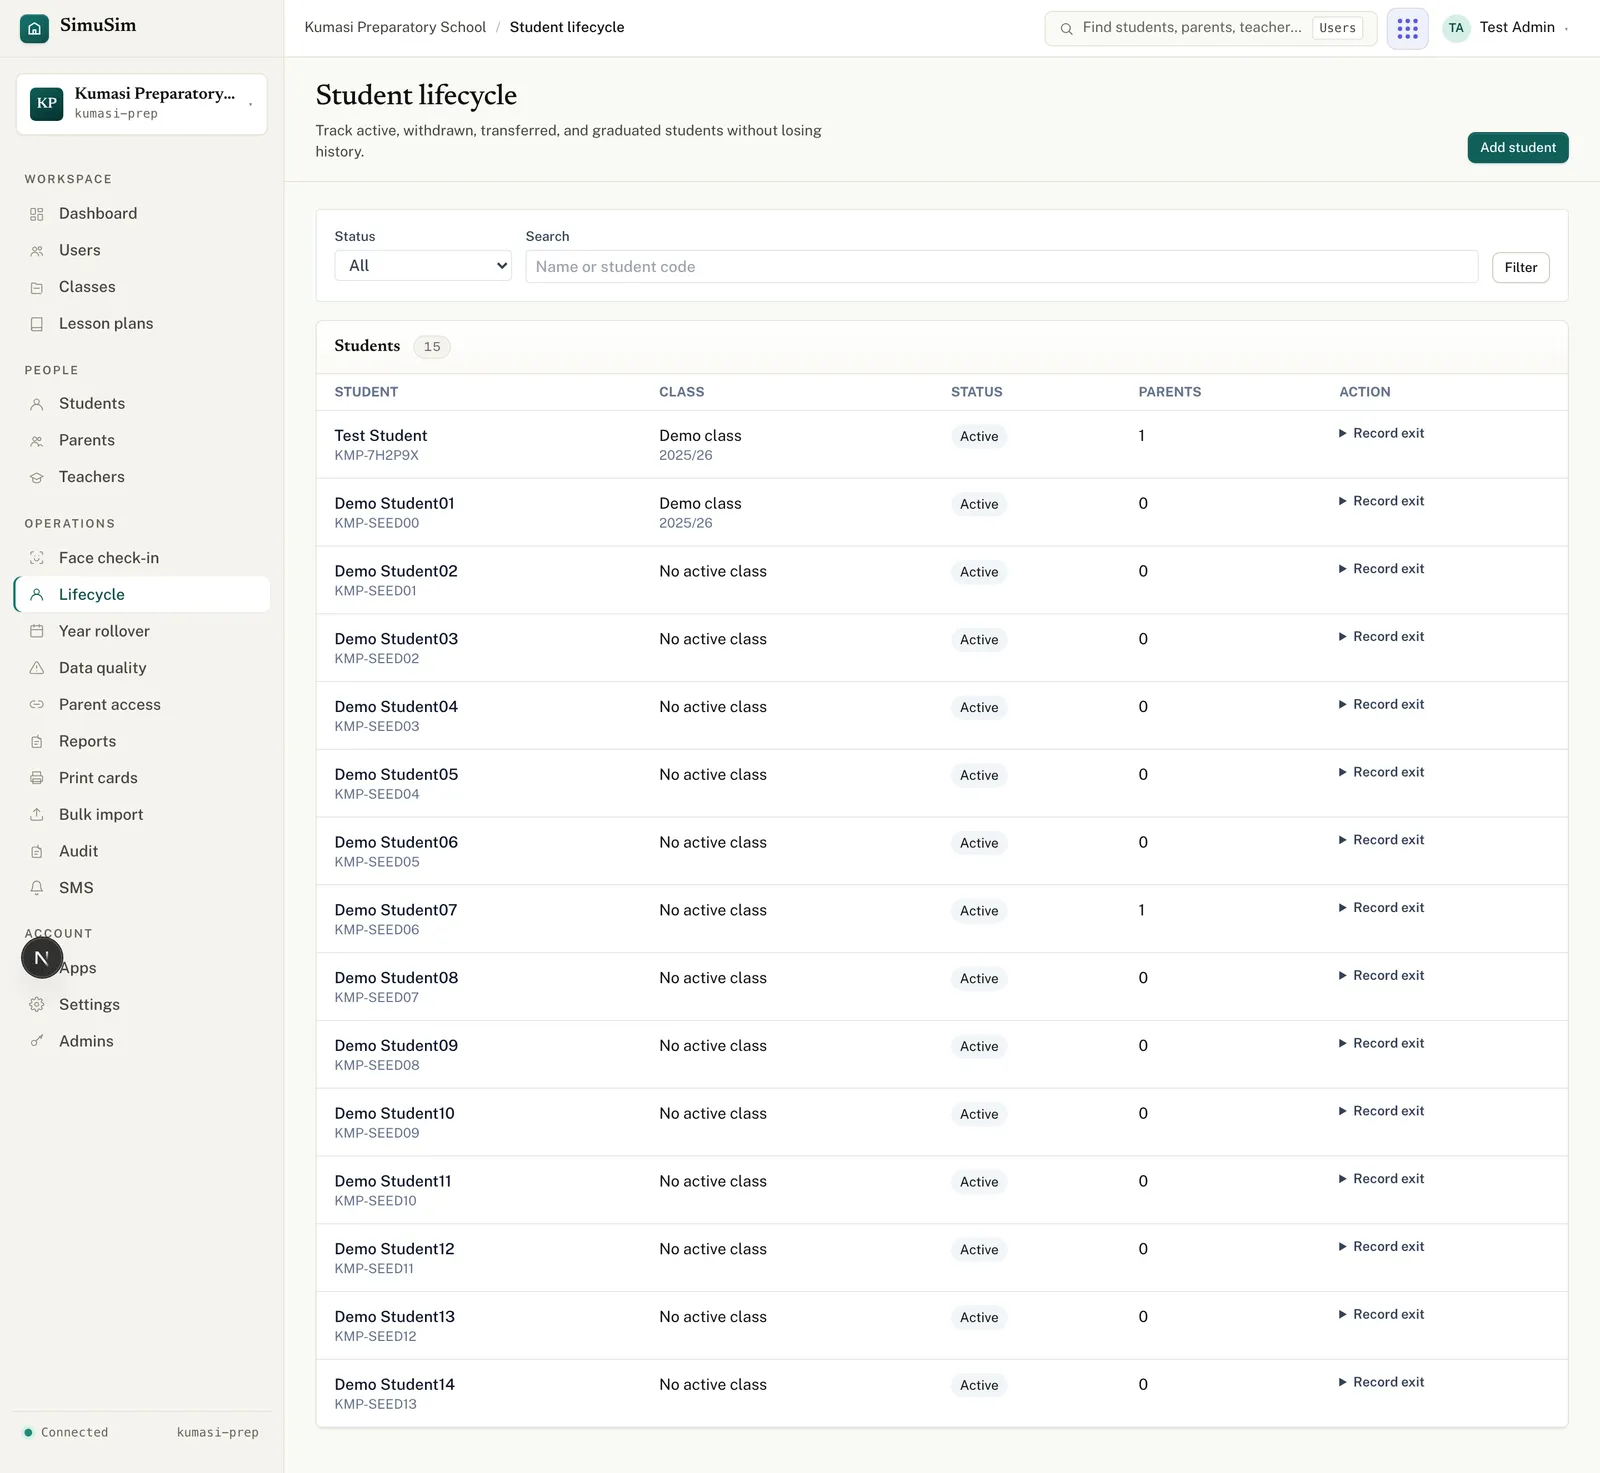
Lifecycle tracks students as Active, Withdrawn, Transferred out or Graduated without ever losing their history. Filter by Status or search by name or code.
Record an exit — on an active student press Record exit, choose the status, set the effective date, add a Reason (and a Destination school for transfers), tick Deactivate login if they should no longer sign in, and Save exit.
Reinstate — on a non-active student press Reinstate, set the effective date and reason, optionally a new class label, tick Reactivate login, and confirm.
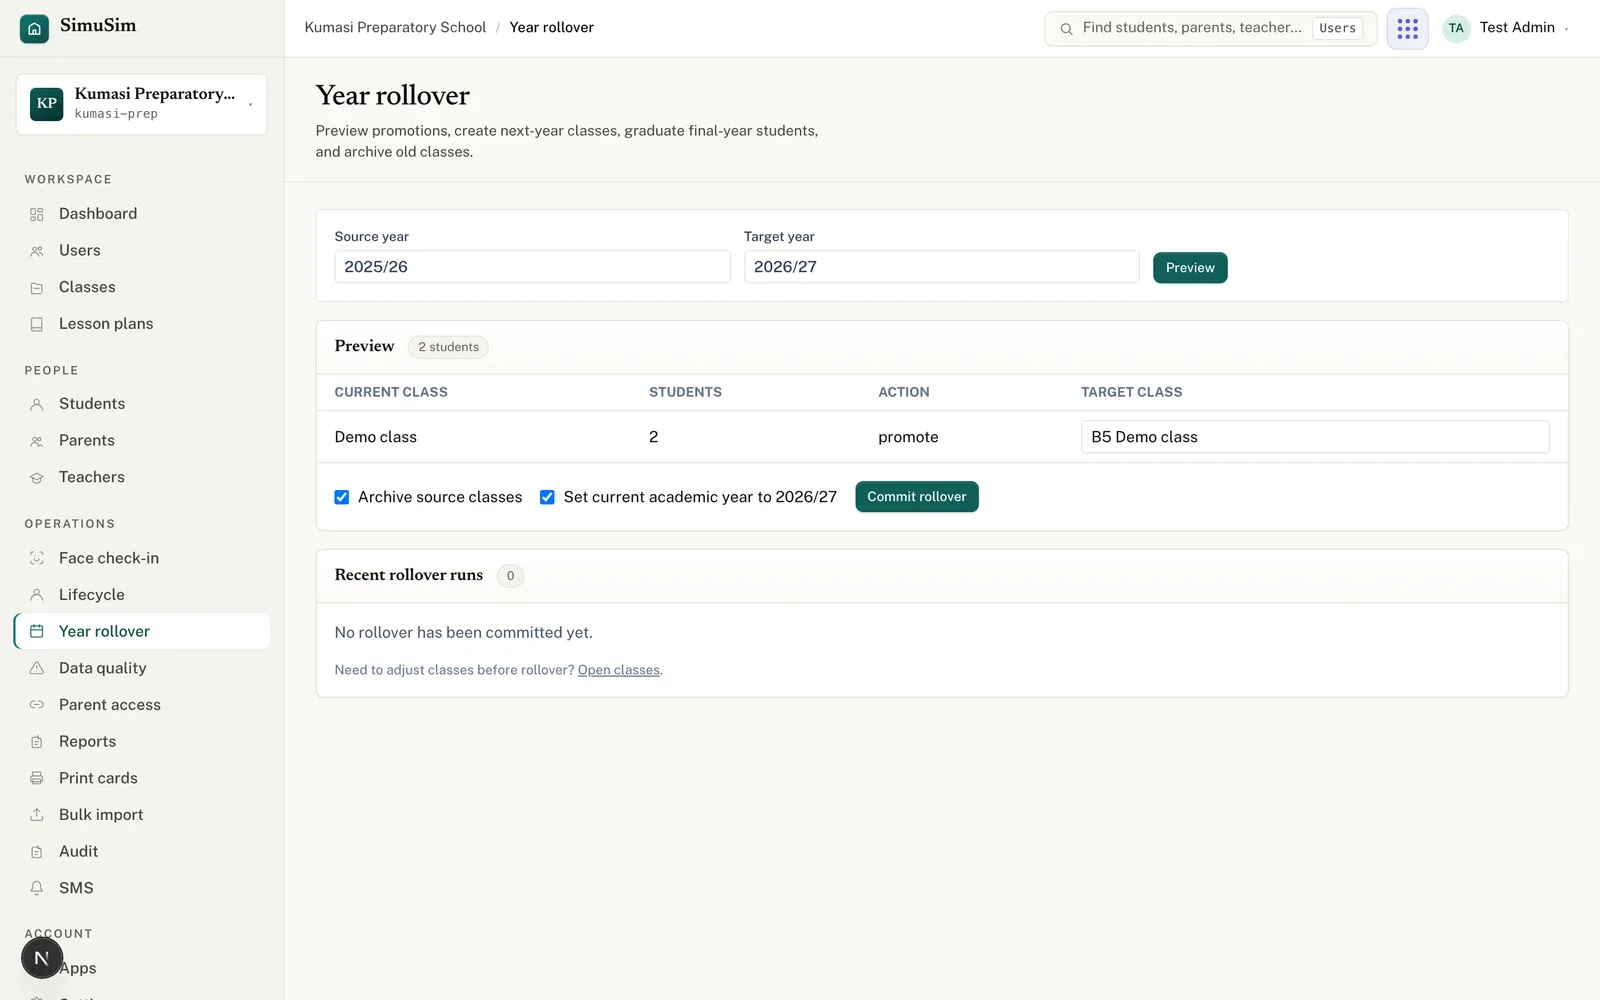
Fig.Handle leavers here before a year rollover, so only continuing students are promoted.
§ 17Year rollover
At year-end, Year rollover moves your whole school forward in one pass. Enter a Source year and Target year, press Preview, set each class to promote, graduate or review (with a target class for promotions), then — once no class is left on review — press Commit rollover. Options let you Archive source classes and Set current academic year to the new one.
Fig.The preview is non-destructive — nothing moves until you press Commit rollover.
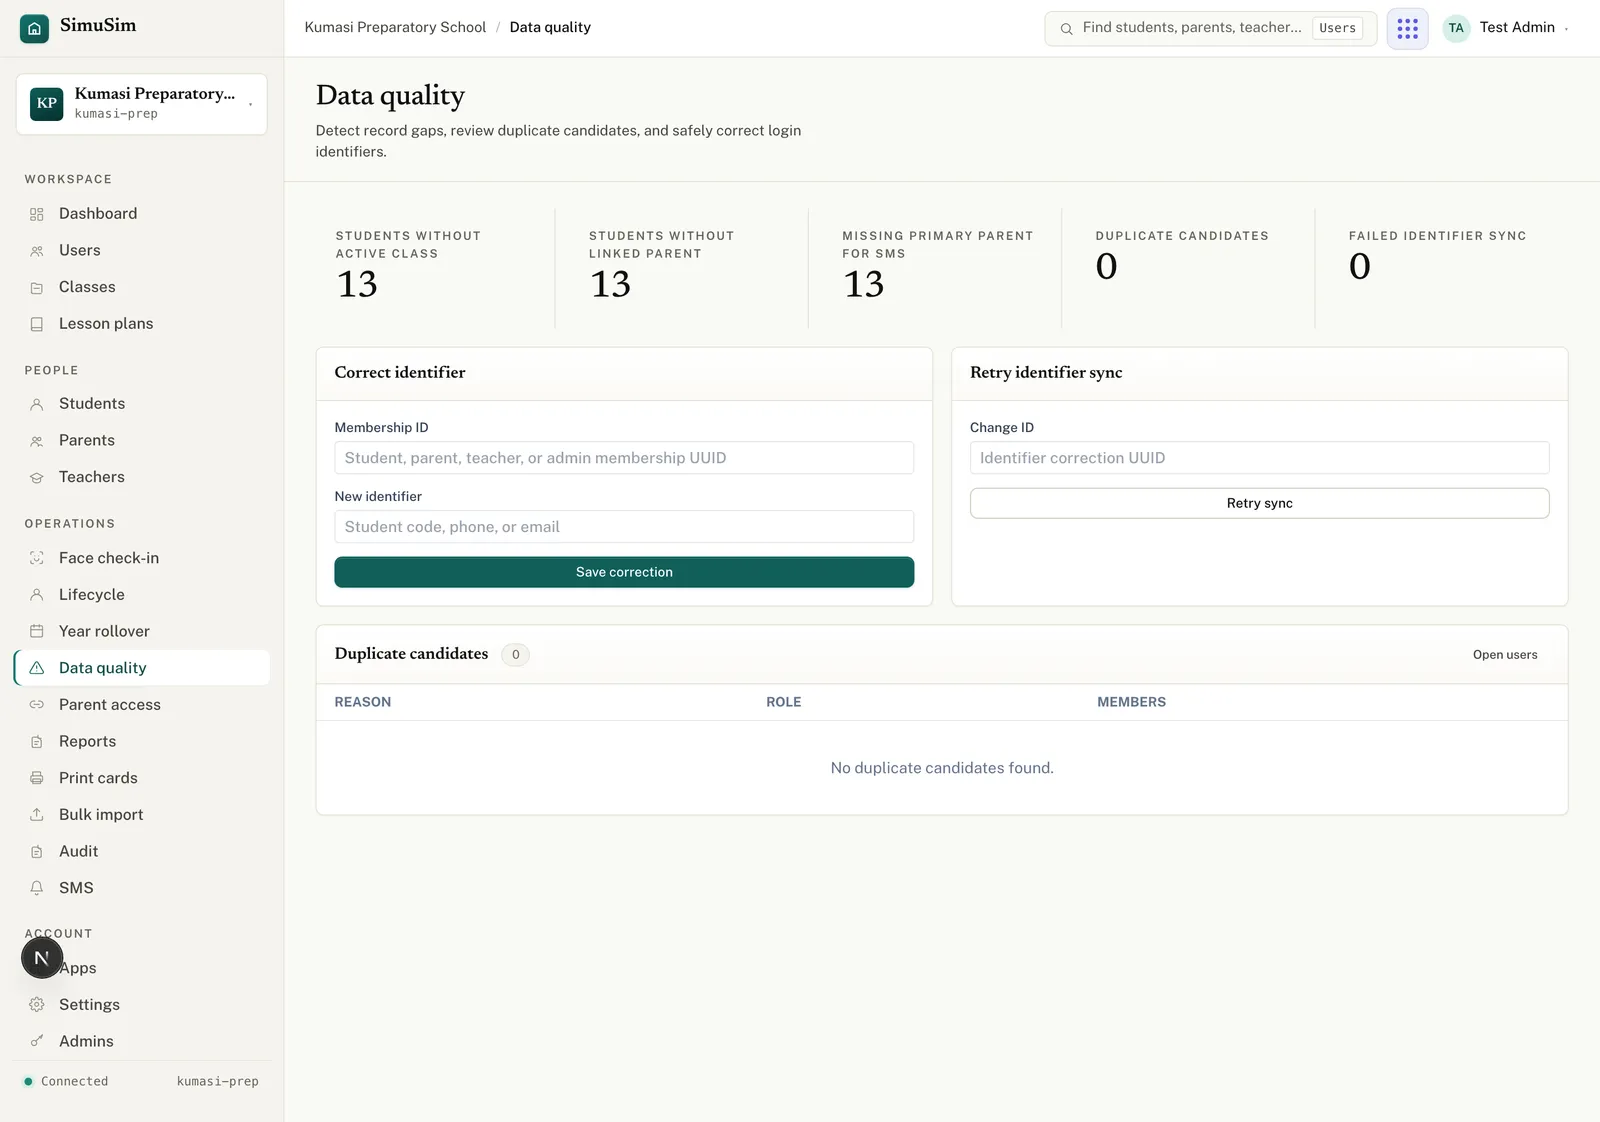
Data quality surfaces record gaps as five counts — Students without active class, Students without linked parent, Missing primary parent for SMS, Duplicate candidates, and Failed identifier sync — and lets you fix login identifiers safely. Use Correct identifier (membership ID + new identifier → Save correction) or, after a failed sync, Retry sync. Possible duplicates are listed below, or "No duplicate candidates found."
Fig.Clear these during the term — not the night before report cards.
§ 19Reports & exports
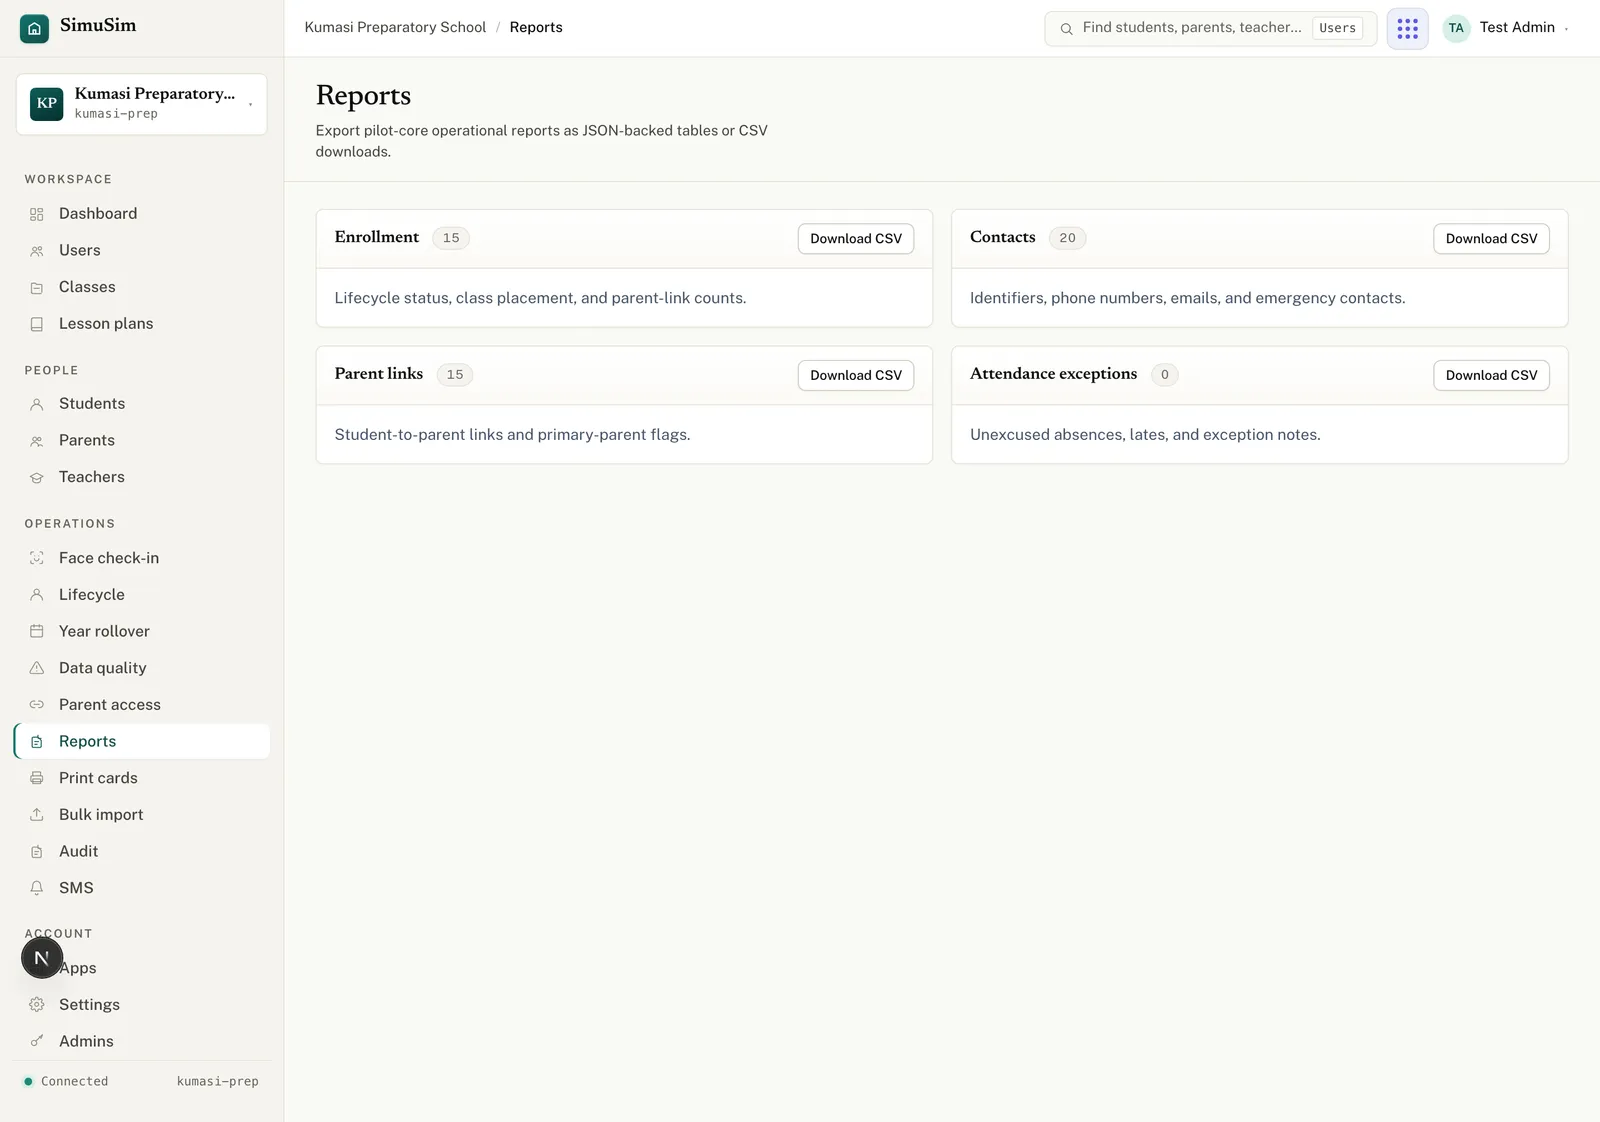
Reports exports your operational data as CSV. Four reports are available, each with a Download CSV button: Enrollment (lifecycle status, class placement, parent-link counts), Contacts (identifiers, phones, emails, emergency contacts), Parent links (student-to-parent links and primary-parent flags), and Attendance exceptions (unexcused absences, lates, and exception notes).
Fig.Each card shows its current row count and downloads a spreadsheet-ready CSV.
§ 20Parent access
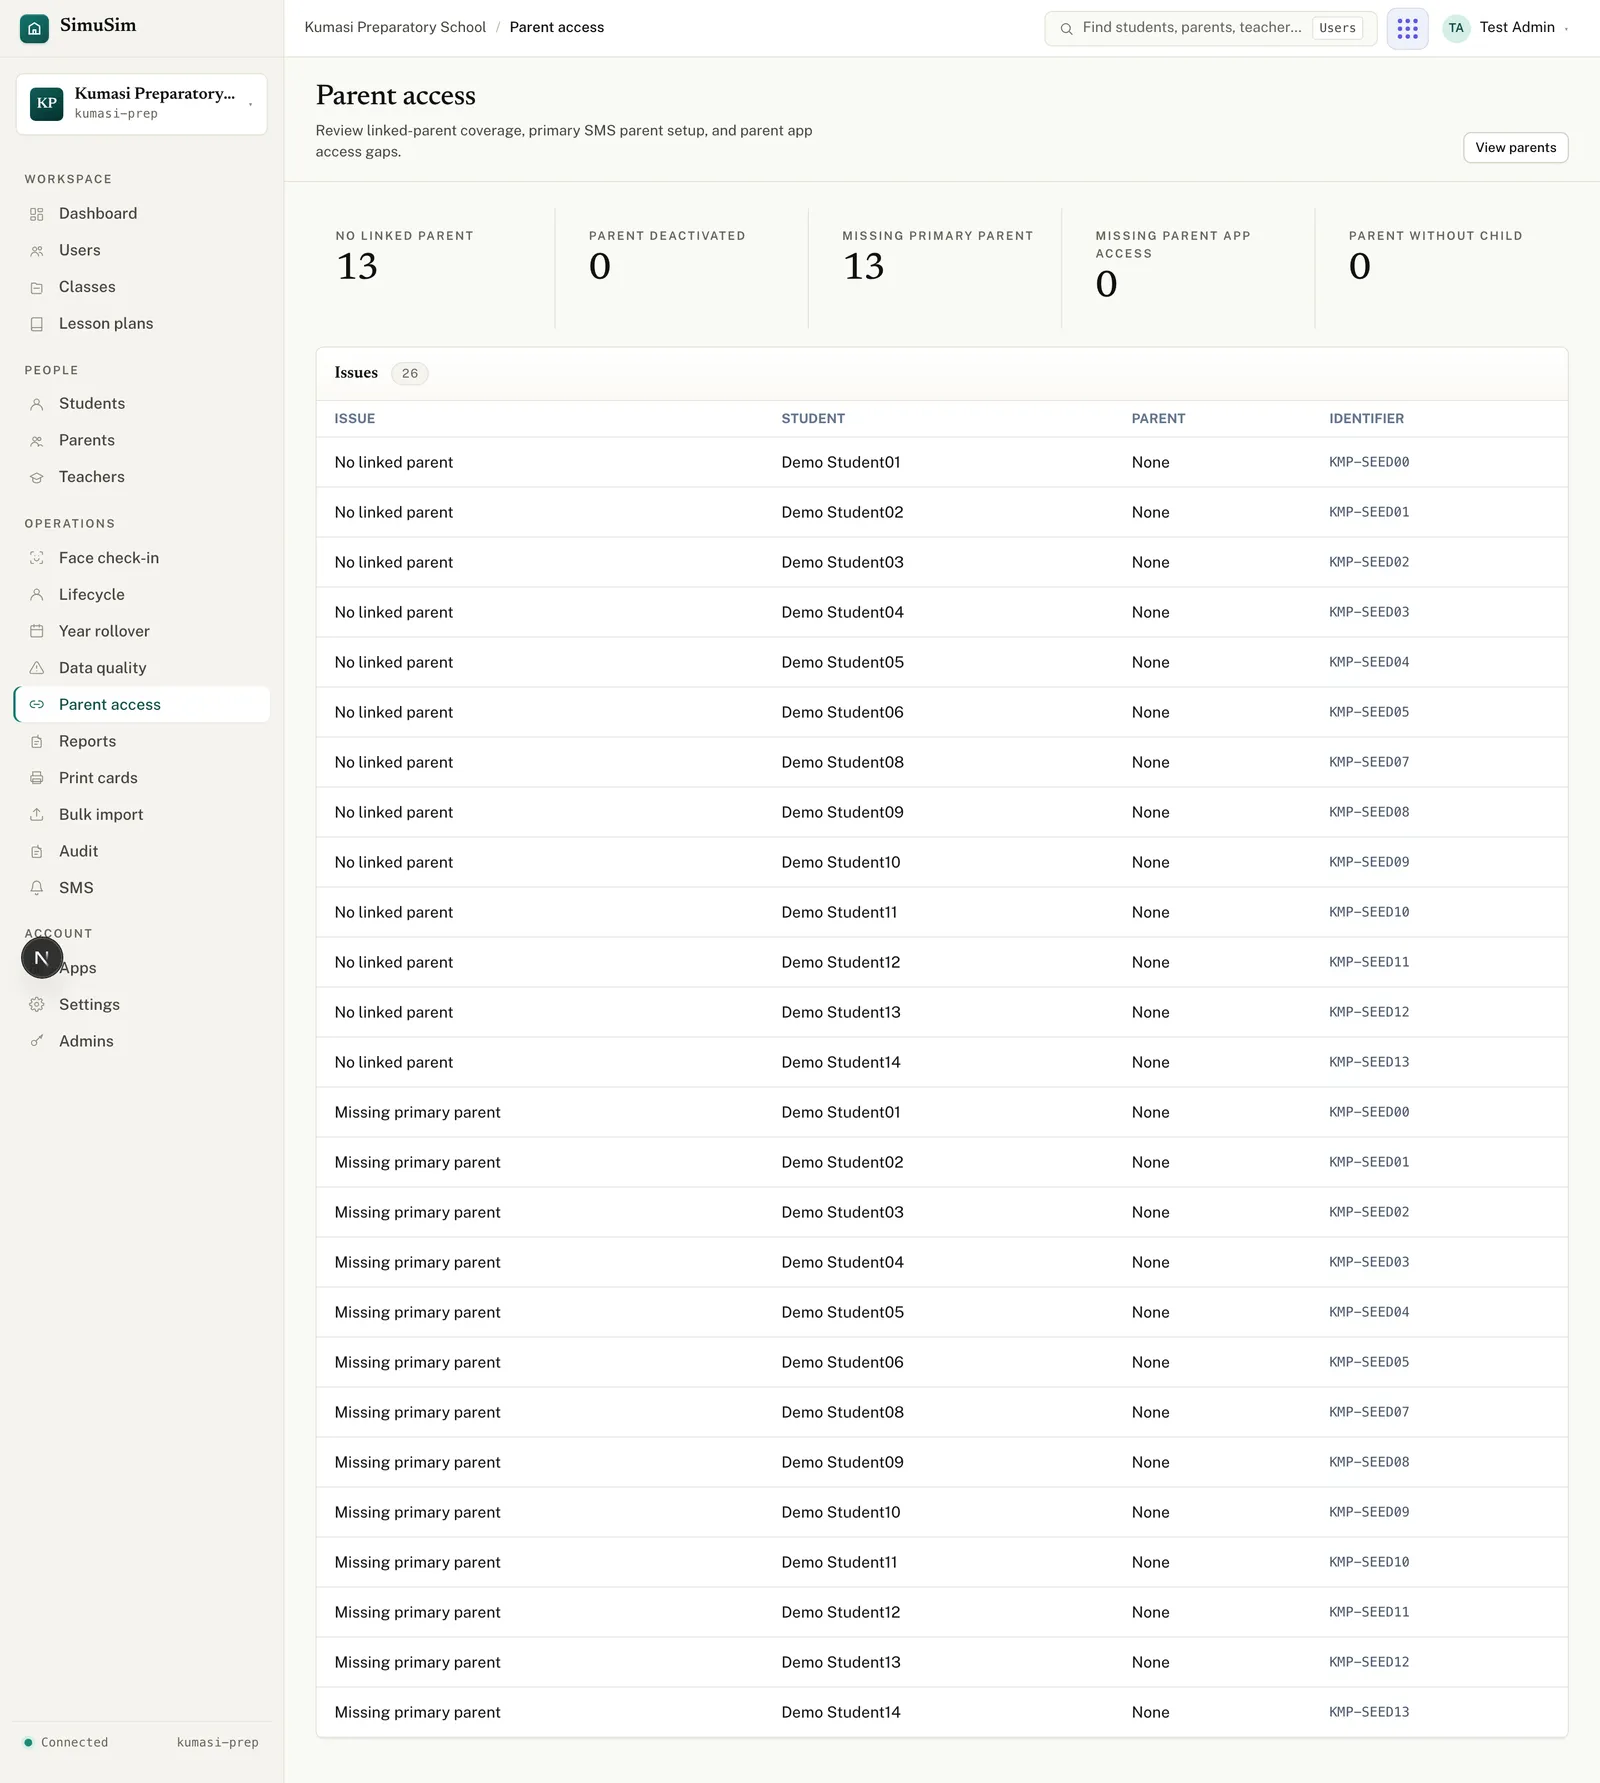
Parent access shows where parents are missing or mis-linked, as five coverage counts — No linked parent, Parent deactivated, Missing primary parent, Missing parent app access, and Parent without child — with a table of each issue and the student, parent and identifier involved. When everything is in order it reads "Parent access setup is complete."
Fig.Every gap here is a parent who won't get grades, fees or SMS. Fix them from each user's page.
§ 21Per-class oversight
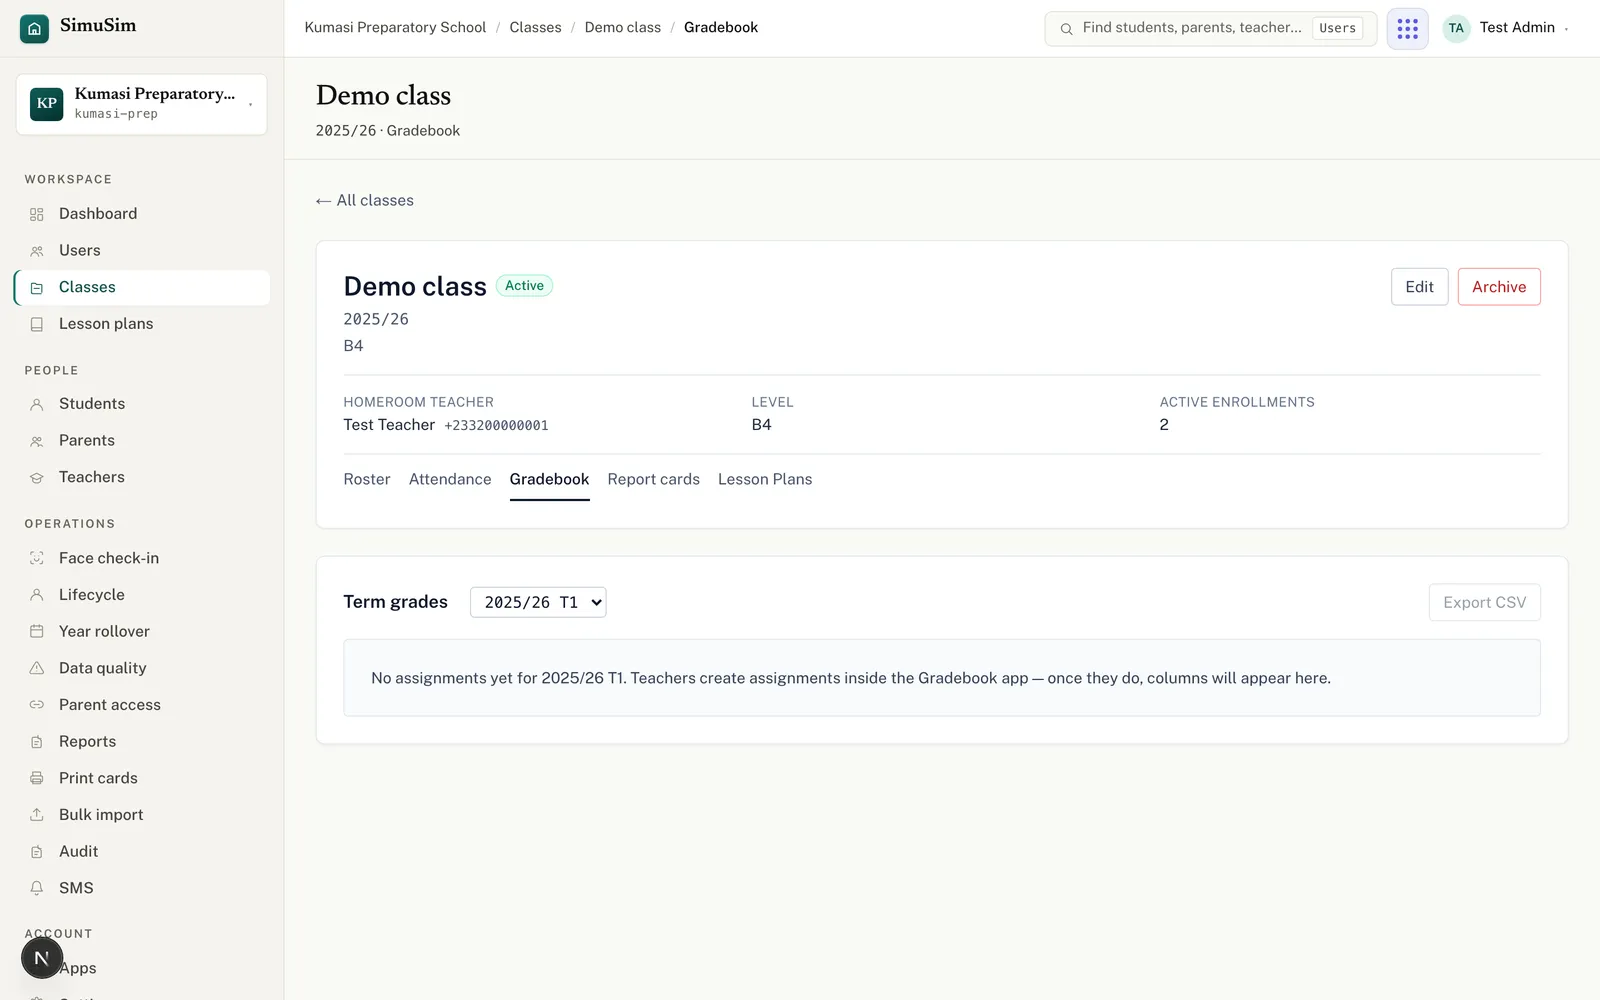
Open any class and you'll see a tab strip: Roster, Attendance, Gradebook, Report cards, Lesson Plans. Gradebook and Report cards are read-only oversight — teachers do the grading in their own apps; you watch and unblock.
Attendance — a grid of the last 14 days, every active student against each date, with statuses present, absent or late. The grid is editable: click a cell to open an edit drawer and save a correction. Use Export CSV to download it.
Gradebook — a term grid of students × subjects, colour-coded term grades, with a term selector. Teachers create the assignments inside the Gradebook app.
Report cards — once a term is published, Download class bundle for the whole class or Download PDF per student.
Fig.The Gradebook oversight grid. Attendance and Report cards sit on the same tab strip.
§ 22Publishing a term
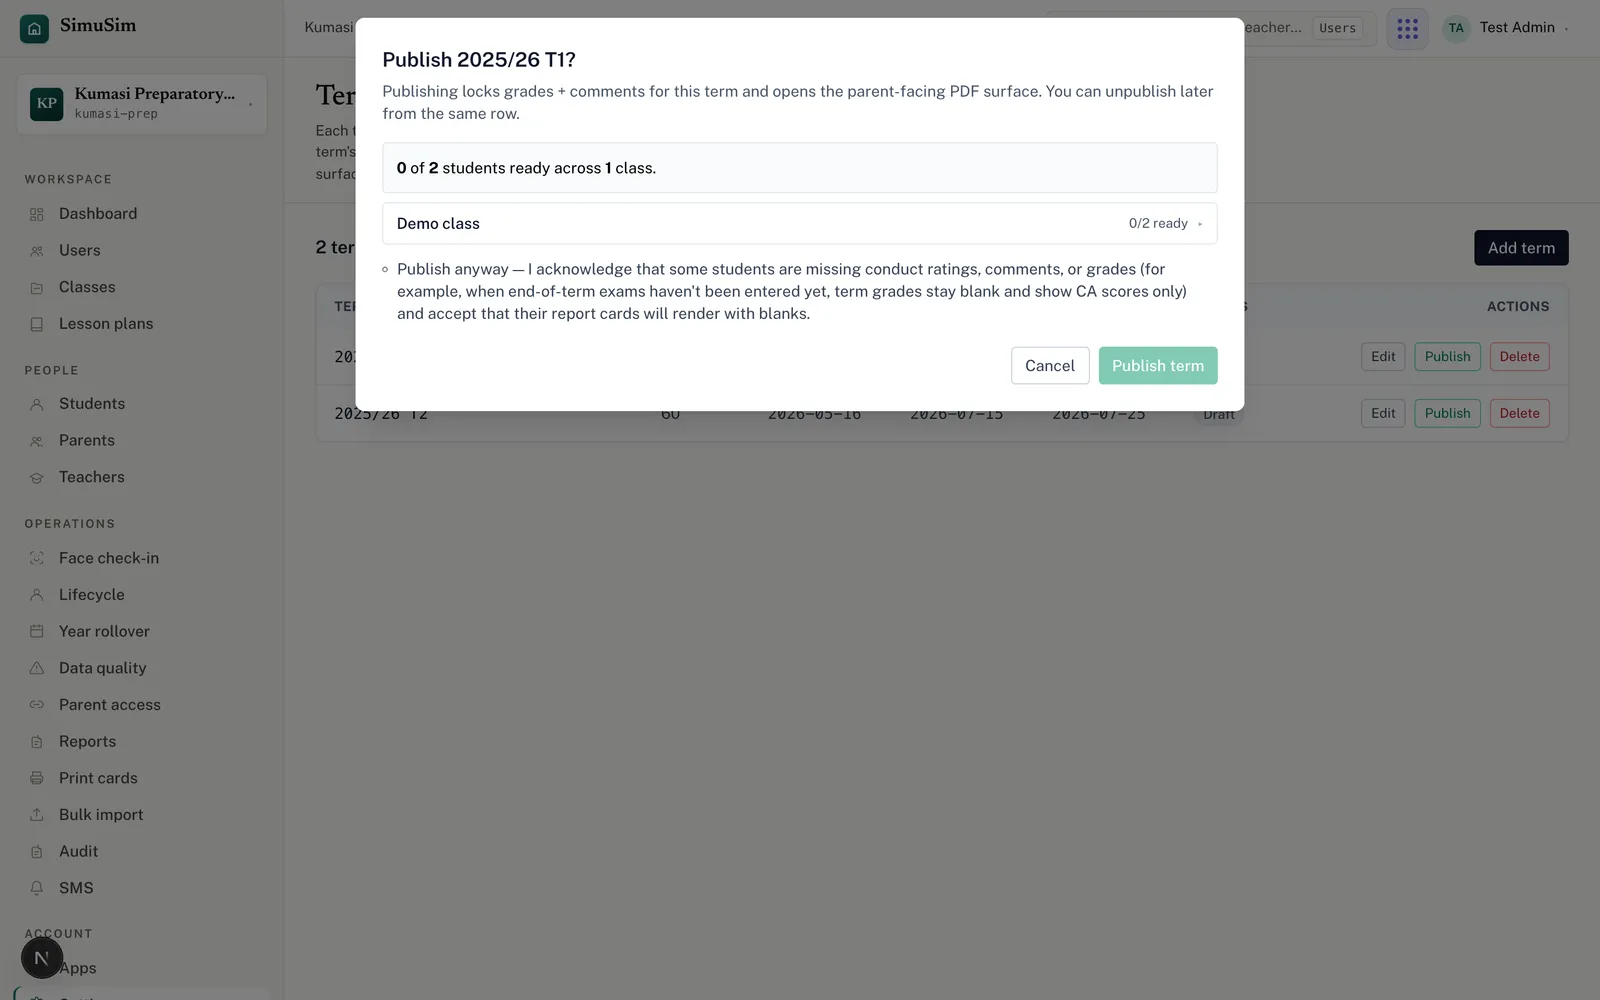
Report cards open to parents when you publish a term from Settings → Term calendar. Pressing Publish opens a readiness check that counts how many students are ready and flags two kinds of issue: a hard block ("Term calendar not configured." — add the term first; each class also shows a "Term calendar missing" status chip) and an advisory warning (some students missing grades, conduct or comments — tick Publish anyway to proceed). Publishing locks the term's grades and comments; you can unpublish from the same row to make corrections.
Fig.The full flow — readiness, publishing and distributing the PDFs — is the Report cards tutorial.
Also for adminsMore admin guides
Several admin-facing areas have their own dedicated guide: